More Baby Stuff…

I know, I know… we’ve already had two girly posts in a row. Where’s the good stuff? Well, the good stuff is in process… patience is a virtue. Until then, let me show you what I’ve been doing with my “spare” time.

This past winter I received my Spring 2020 issue of Crochet! Magazine and a dress in there caught my eye. At the time my best friend was expecting a little girl so I just HAD to make it for her!

Frilly Baby Dress 5-1-20

It’s the frilliest girly dress that I’ve seen! I used the Nicole brand of Storybook yarn (which is now discontinued) and made this in the 9-12 month size in the hopes that it would fit the baby sometime this summer. I mean, I realize that this is a very impractical dress, but look how frilly!!

Frilly Baby Dress Skirt 5-1-20

That is the skirt. Is it awesome or what?! Okay, so perhaps I’m projecting my love of frilly dresses with big skirts onto this poor child. She had better get used to it because there will probably be a lot more of these kinds of impractical garments in her future.

When I was taking pictures of this dress Penny saw and was begging me to let her wear it. She claimed it was so that I could get a better picture of the dress, but let’s be honest… Penny is also a girly-girl so I let her try it on.

Penny Modeling Baby Dress 5-1-20

It was much too big and Penny couldn’t walk in it, but just look at that smile!

Penny in Baby Dress 5-1-20

I might have to make her a ball gown.

Can I just tell you how much I love my new sewing room? Even on the brightest days my previous sewing room was like a cave. Now I have all kinds of light and sparkles on my wall. It’s wonderful! I’ve been working on a backlog of projects, most of which have been baby gifts.

Baby Stuff 5-10-20

This is the batch from this last weekend.

I have two fleece blankets:

Fleece Blankets 5-10-20

A couple receiving blankets:

Receiving Blankets 5-10-20

And a bunch of burp cloths:

Burp Cloths 5-10-20

I still have more projects in mind, but Bob only allows me so many sewing room hours at a time. Then he needs Mama Lap Time.

I did manage to squeeze one more project in this week. A year ago we had some windows replaced in the back of our house, including one over my sink.

New Kitchen Window 6-3-19

It is so bright and beautiful that I felt bad leaving it naked. I had some lace yardage so I decided I would make a lace valance. Somehow I never managed to get to that until yesterday.

Kitchen Curtain 2 5-14-20

It’s not much, but it goes with the lace curtain theme that I have throughout the house.

Also, I was very happy that I managed to actually get it straight!

Kitchen Curtain 5-14-20

That’s all from my sewing room for now. Stay tuned for more baby things (I have another friend due in August) and possibly a purse or two. Who knows what the future will hold!

Posted in Blankets, Crochet, Garment, Penny, Sewing | Tagged , , , , , | 1 Comment

Crocheted Baby Blanket and Hats

One of my very good friends is expecting her first child in August. As soon as I found out my head started reeling with ideas for what I could make as gifts. Unlike most couples nowadays, though, they have decided not to find out if it’s a boy or girl. So anything that I make prior to the little minion (that’s how she refers to the wee one) being born has to be gender neutral. I admit that I might be pushing that a bit because one of the projects I’m working on is all blue, but I’m a girl and blue is my favorite color so it counts.

Anyway, I knew that I wanted to make her a blanket. So I did.

Light's Baby Blanket 5-2-20

Are your eyes bugging out and you’re wondering how in the world I could have possibly chosen those colors for a baby blanket??!! My friends are HUGE Pittsburgh Steelers fans. In their house these colors are definitely gender neutral.

This pattern is the Easy Breezy Mile A Minute Baby Blanket by Christa at The Secret Yarnery. I really like to use her patterns because they are typically easy and work up quickly. This one was no exception.

Light's Baby Blanket Detail

You crochet your strips and then join them together and add a border. I did leave off the popcorn dangles because I figured that would keep it slightly more gender neutral. I’m not sure that guys like popcorn dangles. It’s one of those personal preference things.

Bob was a bit busy so he had his friend, Vader, help with quality inspection.

Light's Baby Blanket with Vader

He gave it the Light Saber sear of approval.

I’ve also managed to make a few more hats. Remember, I’m trying to make in the neighborhood of 40-60 of these by Thanksgiving. I’m not sure I’m going to make it because I’m only on #10 through 12.

Crocheted Hats Detail 10-12

This blue was washed out by the sunlight coming in through the window. I tried to get a different angle hoping that would help.

Crocheted Hats #10-12

The blue one on the right is closer to the actual color, but still a bit washed out.

Again, these had to go through quality inspection.

Crocheted Hats #10-12 Modeled

Vader says, “It looks good… on me.”

After that groan-worthy line Bob suspended Vader’s quality inspection certification, so Bob will be officially inspecting for a while.

Bob 5-5-20

“It’s so hard to find good help!”

Posted in Blankets, Cats, Crochet, Hats | Tagged , , , , , | 1 Comment

Bodycon Dress 2

Now that my sewing room is mostly together I wanted to get back into Project Custom Clothes for my friend, Jamie. When I last posted about it in November I’d just tried to create my first bodycon dress and had failed spectacularly.

Bodycon Dress 1 Front

My biggest issue at that point was I needed to make sure that Addie conformed to Jamie’s body shape as best as I could get her. Jamie had sent me pictures of her dressed in some form-fitting clothes and then had sent those to me so that I could compare how they fit her versus how they fit Addie.

At this point there was a hiatus because I was trying to get through the holidays and then get through my bathroom closet and sewing room remodeling projects.

There was also a delay because I was nervous and hesitant. I knew that it was going to be a lot of work and fussing around to try to get Addie padded out just right. I worried that I wouldn’t be able to come close to what I needed, and then I worried that I had invested a lot of time and money into a project that would end up failing miserably. However, the Biltmore did not use the guy down the road to carve the goblins sitting on the roof. Instead they used craftsmen who had studied and lived stone carving all of their lives. At one point they really sucked at their craft, too. That’s the long way of saying that everybody begins from a point of zero ability and zero knowledge. So I squared my shoulders and went to work.

I’m glad I had the pictures and clothes from Jamie because the biggest change I had to make was in Addie’s shoulders. Jamie is a tiny and petite woman, but she has quite a set of shoulders and rib cage. (FYI… the following statement is a compliment) I think that she could have easily dressed like a Gibson Girl without having to add much cinch or padding to her corset.

I’m not sure how much you will be able to see the differences, but I’ll post a Before shoulder padding and After:

This illustrates how the same dress (no adjustments had been made) will hang differently based on the shoulders. That’s the reason why most fitting instructions for dresses and tops have you start at the shoulders and work your way down. Often once you fix the shoulder issues some of the other problems will go away.

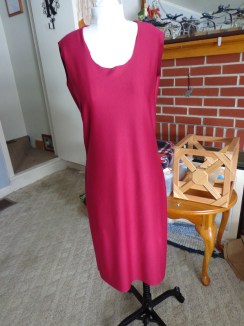
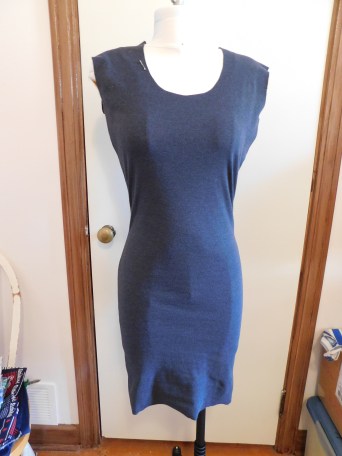
Feeling better about the fit of garments that I would be trying on Addie I decided to plunge into the bodycon dress. I didn’t go back to the red one, though. Instead I decided to use a pattern that was definitely for a very form-fitting dress. I used McCall’s M7999.

Bodycon Dress

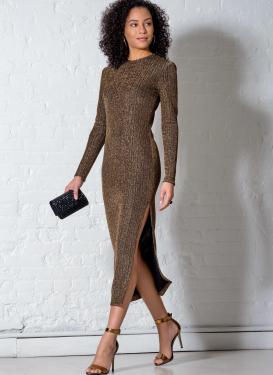
Instead of using numbered sizes, this one does the range of XS to XL, which makes sense since there is a lot of stretch to the fabrics you should be using. This time I chose the size that corresponded to Jamie’s measurements (mostly) and used a Polyester/Cotton/Lycra Interlock Knit. The only adjustment I made to the pattern was to create more of a scoop neck because I know there is NO WAY Jamie would be comfortable with such a high neckline (we think she must have been strangled in a previous life and now can’t stand anything even remotely constricting near her throat).

Bodycon Dress 2 Front1

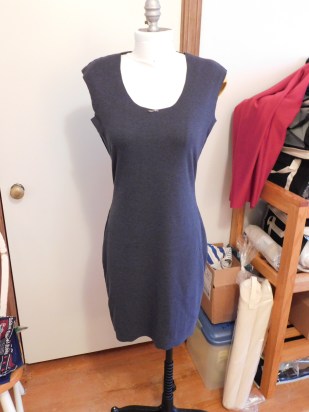
I was very pleased. I knew there would be some issues, but I didn’t feel that I had completely failed. From the front most of it looks good, except for the saddle bags at the hips. I told Jay that it looked like she was wearing the old riding pants with the poofy sides under the dress.

Bodycon Dress 2 Hips

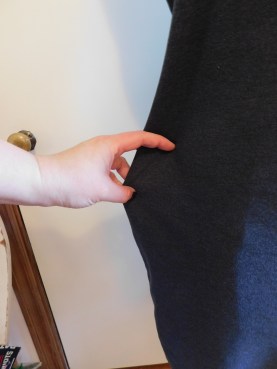
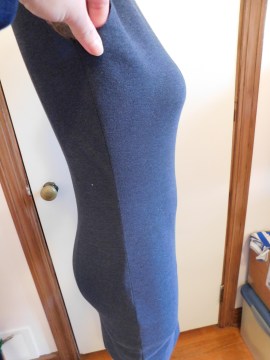
I was not stretching this at all. I had merely tugged it to see how much extra material was sitting in this area. It looked to be at least 2″ on each side. Then I turned Addie to look at the side.

Bodycon Dress 2 Side1

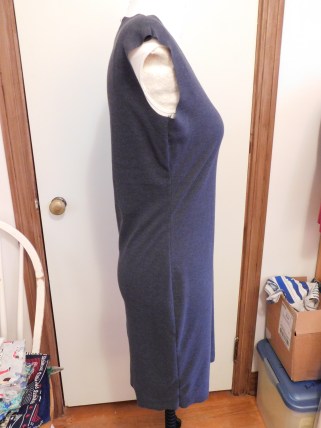
This is definitely not a flattering fit from the side. Again, this is suppose to be a body conforming dress. That definitely wasn’t happening here, but when I turn her around to the back you will see why.

Bodycon Dress 2 Back1

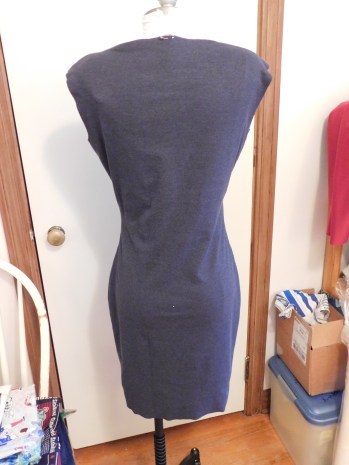
The shoulders seem to fit good, but there is all kinds of extra material swimming around her back (and a better view of the poofy pants at the hips). I grabbed my pins to see how much extra fabric I was dealing with in the back.

Bodycon Dress 2 Extra Fabric

You can’t really tell, but I had almost 2″ of fabric pinned up to get the wrinkles out. What does this mean? This means that we need to do a sway back adjustment. To be honest, after seeing Jamie’s pictures, I realized that a sway back adjustment will be needed in any pattern that I use for dresses or tops. If you’ve never heard of this adjustment, let’s see if I can do an okay job of explaining it, using one of my very horrible drawings.

Sway Back Adj

(I will explain more of this drawing later). Let’s pretend that the drawing on the left is of your “normal” person standing in profile. The big pattern companies design their patterns to fit these people. This is why so many sewers have to make adjustments to patterns in order to get the garments to fit their bodies. Well, if you stand especially tall (like we’re suppose to) with your shoulders squared and your bosom jutted out in front of you, this actually causes a curve to your figure and shortens the distance between your shoulders and lower back. The person on the left will have a much longer measurement (and require more material to span that distance) than the person on the right. I realize the drawing is a bit exaggerated, but hopefully you get the idea.

Before I did a sway back adjustment, though, I wanted to take the extra fabric out of the sides. I decided to do the adjustments one step at a time so that if something went completely wrong I would know exactly what caused it. I calculated approximately how much material I wanted to remove and then adjusted my pattern.

Bodycon Dress 2 Grading Pattern

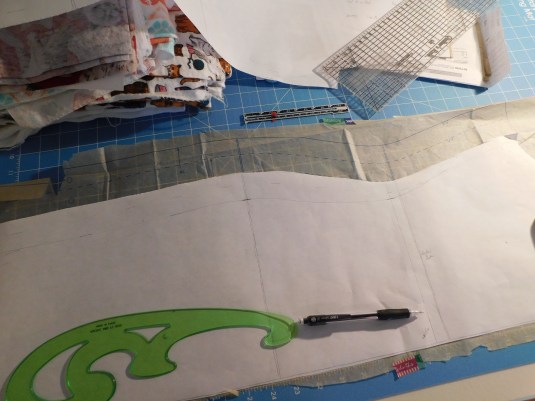
I actually thought that I would grade the pattern down, but after getting this far I realized that I would just remove the extra while keeping the same shape and wouldn’t worry about the pattern for the next size. Then I recut the fabric pieces (I’ve used basting stitches to sew them together so that I can easily remove it), and basted them back together. Let’s see how it looks after the width is removed.

Bodycon Dress 2 Front2

I only removed width starting around the waist area, which is why the top still looks slightly baggy. But look how much better it sits at the hips! Let’s get a side profile comparison.

Look at the difference! I’ll admit that I might have taken off a little too much, but I can always add a smidgen back onto the pattern. Remember, this is not how it’s going to look on Jamie exactly, but it will be very close. Now let’s look at the back.

We definitely fixed the conforming issue at the hip. However, now the extra material on the back is REALLY noticeable. Also, I don’t think that I had done a good job smoothing out the back of the dress. Addie has a bodysuit on to keep all of her padding in place and it really likes to hold onto this fabric.

I am at the point where I definitely need to make the sway back adjustment. Most of my fitting books, though, only discuss how to adjust woven fabrics, garments with center seams, or garments with other seams. This is a bodycon dress so I only have the side seams to work with and everything that I’ve been reading assumes that you’ll have a back center seam. Let’s take a look at my drawing again so that you can see my quandry.

Sway Back Adj

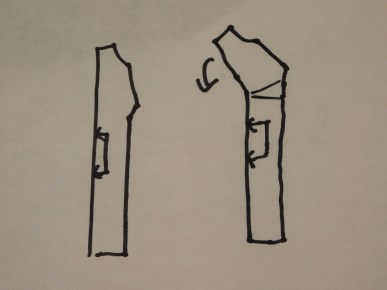
When you do a sway back adjustment you figure out how much material you need to remove at what spot and then pivot at the side to move the back down and create your new pattern line. Again, that makes sense because you want your side seam to remain the same length, but you want to remove a portion of the back area. I had to remove 2″ from the back of this dress. When I did the pivot like everything was saying, my pattern piece looked almost exactly like the one on the right. It had quite the sharp bend. You can’t put that on a center fold. So what do you do? You turn to the internet because obviously you aren’t the first person to have this issue.

I found a couple of blog posts that described the process of doing the pivot for the adjustment, and then you have to redraw the pattern piece in order to straighten out the back piece if you want it to be aligned on the center fold of your fabric. It requires a lot of drawing and monkeying around that I wasn’t looking forward to doing.

I dragged my feet and procrastinated. The pivoted pattern laid on my cutting table taunting me as I justified my delay with the excuse that I was doing more research. Then I stumbled across the most wonderful blog post in sewing history at a blog called Pattern.Scissors.Cloth. Not only does she do a WAY better job of explaining the sway back adjustment, but she also shows a much easier way of doing it based on her experience. Please go check it out if you have any interest in doing this type of adjustment because it will save you a TON of time!

I adjusted the pattern, recut the pieces of fabric and basted them back together. Let’s see the first (baggy) version versus the final adjusted version.

Not a huge difference from the front. Let’s look at the side, though.

What a difference! Yes, there are still some drag lines, but honestly I’m at the point where I need to send the muslin (my adjusting garment) to Jamie to have her try it on and see if some of those issues are resolved. I think she will fill out the top in different spots so the fabric will sit differently on her.

Bodycon Dress 2 Side Wrinkles 3

This is just a guess on my part based on the fact that when I pull the underarm up and out, the wrinkles mostly disappear. For good measure, let’s take a look at the back.

I was so happy with the results that I had to text a picture of it to Jay while he was at work. He knew that I had been struggling with the fit, so even if he didn’t quite understand what he was looking at he could completely understand my excitement.

There are certain things about Addie that I can’t adjust to exactly match Jamie, so that’s why I’m going to stop adjusting this particular muslin and send it to Jamie for some final fitting. I’m just excited that I actually have something to send Jamie to try on. Once I get this pattern just right I should be able to theoretically use it to make numerous dresses out of different stretch materials. I can lengthen the hem or add sleeves, but as long as I have the core part of the dress pattern perfected I shouldn’t have any issues.

I decided to use this adjusted pattern to fix the problems with the original bodycon dress that I had attempted, but that failed spectacularly. *sigh* Once again I fell into the barrel of thinking that I sucked and can’t do anything. Except, after doing more research it dawned on me what failed, so this weekend I’m going to take a second stab at it. If I can get a dress made out of Ponte knit (the red fabric) that fits almost as good as the gray fabric then I will be really happy. Wish me luck!

Posted in Garment, Project Custom Clothes, Sewing | Tagged , , , | Leave a comment

N-Scale Layout- Sidewalks and Ballast

2020Layout-Town Landscaping

The villagers were happy with how the their town was starting to really come together. Once all the grass had been planted they felt like it was starting to feel like their home. They couldn’t wait for the buildings on Main Street to be installed. They had been living like nomads for years every since eminent domain had been instituted and their original town had been destroyed to make way for a furniture manufacturer.

Train Layout - City 7-7-16

(The former site of Jayville)

Jayville had been granted the use of the current property where they were building because nobody else wanted it. There were rumors of buried nuclear waste, Indian burial grounds and even that it was frequently visited by UFOs. In all reality, it was because nobody else wanted to build a town in an area that was going to be completely surrounded by train tracks. This line was going to be a transition area for freight trains crossing from one busy railroad line to another. There will be freight trains rumbling through at all hours of the day.

The villagers didn’t care, though. They happily continued to establish their village in what they deemed to be a very beautiful piece of property.

One of the last jobs the concrete crew had to complete was installing sidewalks on Main Street. In order to avoid squabbles with the landscapers (and possibly more legal fees) they decided to build the sidewalks off-site and have them flown into town and placed in one piece. It was quite a task!

First they had to establish the footprint of the block area. Then they poured a single pad that included not only the sidewalk, but also the foundation for the buildings.

2020Layout-Main Street Sidewalk1

Once that had cured they mixed up a slurry layer that would contain the base color of the sidewalks and exposed cement.

2020Layout-Main Street Sidewalk2

As that layer was starting to set up they roughed in the sidewalk portion.

For the last step they mixed up the final layer of sidewalk and delicately poured it so that it would allow for the easier placement of the buildings against the sidewalk.

2020Layout-Main Street Sidewalk3

2020Layout-Main Street Sidewalk4

Due to a pending patent and proprietary information I am unable to show you how the company air-lifted the portion of sidewalk and flew it to the site. Let’s just say that it involved a few helicopters, lots of strong cables and many prayers. And that’s all I can say. At least about the air-lifted concrete. I have a LOT more to say about the village.

2020Layout-Main Street

Isn’t that exciting? The villagers were beside themselves with joy. They had a giant party the first night with lots of merriment and reveling. However, Otis (the town drunk) discovered a potential issue with having tracks run through the center of town. He stumbled into the open area between the rails and almost scared himself sober. Luckily he was okay, but there was definitely an issue with having that kind of an opening where people would be constantly crossing the street.

Capital expenses were through the roof (literally… as you can see in the picture above one of the buildings is still waiting for its roof until there’s more money in the budget). How could they make the track safer for pedestrian traffic?

Cliff Brown, the local handyman and drifter, had an idea. The village council heard his suggestion and felt that since nobody else offered up any solutions they would give Cliff permission to go ahead with his idea.

Cliff went out and bought a lot of plywood, and took it to his son-in-law who has an industrial-sized laser.

2020Layout-Track Filler

They cut pieces out that were wide enough to sit in between the rails, but wouldn’t impinge upon the functions of the train.

2020Layout-Track Filler2

Cliff then measured the thickness of the wood, compared it to the depth that would need to be filled in along this section of track, and topped the wood with concrete to bring it up to the correct height.

2020Layout-Track Filler3

Once the pieces are installed he will paint them black to match the surrounding asphalt. Very ingenious, but I question where he procured his materials as there were articles in papers from surrounding towns about thefts of plywood, concrete and paint around this same time.

After the landscapers had finished cleaning up their mess from seeding, the railroad was able to go in and put ballast around their track.

The president of the railroad had a son who had decided he wanted to get into the stone business. When the first ballast was laid the railroad just happened to purchase the ballast for the first part of the project from the president’s son.

2020Layout-Ballast 1

The guys putting down the ballast were not impressed. There was a lot of dirt mixed in with the stone. It was as if the stone company had gone out in the back creek and used shovels-full of it to fill the railroad cars. They had no choice, though. They had to use it.

2020Layout-Ballast 2

The more they used it, the more they grumbled. At one point they started to call this the Graham Cracker Crust line. The president of the company heard about the belly-aching and went out to investigate.

2020Layout-Ballast 3

He took one look and called up his son to cancel the rest of the order. A phone call was made to the company who provided ballast to the railroad in this area and the loads began to steadily arrive.

2020Layout-Ballast 4

The railroad crews were so much happier with this stone. It was the right size, it handled well, and there wasn’t a ton of dirt mixed in with it. They were able to quickly get the rest of the track finished.

2020Layout-Ballast 5

2020Layout-Dead Man's Corner 4-27-20

2020Layout-Ballast 6

2020Layout-Main Street 4-27-20

Things were beginning to really come together! Trains were starting to run through the area, construction crews showed up to finish the inside of the buildings, and plans were put in place to erect a church. Life was looking up for the residents of Jayville.

Yes, things were really looking rosy… and that’s when a crisis hit. As a cliff-hanger I’ll just leave you with a picture that foreshadows the impending doom…

2020Layout-Oak Trees

Posted in model trains, N Scale Train, Trains | Tagged , , | Leave a comment

Project Linus Blanket #32

Project Linus Blanket #32:

Project Linus Blanket #32 4-17-20 - A Yarny Tale

A Yarny Tale

This isn’t the best picture, but currently it’s the easiest place to photograph a blanket of this size. The rest of my house is a mess (I’m still trying to get things moved into my sewing room and out of the other rooms).

This was the blanket I started to make when I wrote the post a few weeks ago called A Yarny Tale. When I make these blankets I concentrate on the little boy at the end of that story. He is the reason why I continue to make blankets for Project Linus. I have a zillion other projects that I want to eventually make, but I try to crochet a blanket on a regular basis so that I don’t do too much selfish crocheting.

Project Linus Blanket #32 Detail

In this blanket I used Premiere’s Sweet Roll “Blueberry Swirl”, Stitch Studio Classic “Light Blue” and an unknown light blue that I had in my stash. The Stitch Studio color is one that I used to buy at A.C. Moore and is one of my favorite yarns. Needless to say, I was VERY excited when I discovered that Premiere Yarns will now be carrying this line of yarn!! Seriously, I will pay the extra money to use the Stitch Studio yarn instead of the Red Heart Super Saver. The quality and feel is just so much better with the SS yarn.

I actually finished this blanket about two weeks ago, but I had other things that I needed to blog about first. I’m lucky enough to still be working during this pandemic so I haven’t had any extra time to sit and crank out more blankets. After moving the majority of my sewing stuff out of the old area, though, I was able to reorganize my yarn stash.

This is what my yarn stash looked like at the end of May LAST year:

Yarn Cubbies After 5-20-19

In one year I’ve had two large orders from Ice Yarns and A.C. Moore went out of business. This is what my yarn stash looks like now (after organizing it):

Yarn Cubbies 5-1-20

The pink bag has a Christmas project kitted up, the laundry basket needs to be wound with the ball winder, the black yarn organizer has a Project Linus blanket ready to be stitched, and the gray totes contain shopping bags of kitted Project Linus blankets that I just have to grab and start stitching.

I realize that it looks like a mess in this picture, but I assure you that it is in much better shape than just a few weeks ago. It makes me so happy!

Posted in Blankets, Charity, Crochet, Project Linus, Yarn | Tagged , , , , , , | Leave a comment

N-Scale Layout – Landscaping

The paving crews are still arguing each other in court, so while that’s happening it was decided to turn our attention to the landscaping outside of Jayville’s village limits. You can usually get away with doing a lot more out in the rural areas.

2020Layout- Parking Lot Paving2

The North Bend area was rocky and barren. Samples of the soil were taken and it was determined that it was good gravel ground. The farmers in the area were upset that their corn fields were taken over by the railroads, but the farmers were unable to get enough Benjamins together to compete with Mr. Vanderbilt. He has an entire corps of Benjamins.

Any good gardener knows that you must prepare the soil before you just throw some grass seed on it.

2020Layout-Prepping Soil

To show that no bad feelings existed, the landscaping crew purchased liquid manure from the surrounding farms to prep the soil. They even hired a few of the farmers for a few hours to turn the soil for them. After all, it was a big job and they wanted to get the grass in so that it could take hold before the dry season approaches.

2020Layout-Grass Planting2

You know the grass seed/fertilizer mixture that gets sprayed onto the grassy areas of a road after a construction crew has finished a project? That’s what they started to use here, but then they realized that it was going to take forever to cover all of the acreage with a little garden hose. They called in a few favors and secured one of the planes that are used for fighting fires. These planes usually drop a fire retardant on fires, but in this instance they were dropping grass seed and fertilizer.

2020Layout-North Bend1

A job that would have taken eight weeks only took four after the planes were called in. To be fair, it took the planes just a few hours to drop all of their mixture in the areas required. It took the next four weeks to clean up the areas where the mixture wasn’t supposed to go (tracks, parking lots, roads, etc).

2020Layout-North Bend Landscaping1

This picture was taken during the third week of clean-up. Don’t worry. None of it went to waste. The landscaping crew made a deal with a few of the local highway departments. I haven’t been told what was exchanged, but the empty road salt buildings were soon filled with the grass seed mixture for temporary storage.

Resources were starting to get tight and there was still a lot of landscaping left to be done. One of the biggest challenges was the hill next to Dead Man’s Curve.

2020Layout- Track Cut-Out2

The villagers were crying about what an eyesore it was and how they didn’t want that ugly behemoth hulking over their beautiful new village. The local garden club about had a fit when they realized that the landscapers only intended to seed it and leave it at that. Mrs. Bixby, the President and Founder of the Jayville Gardener’s Club, met with the owner of the landscaping company. Much to her surprise and delight he gave her club complete control and responsibility over the hill’s landscape. The landscaping company seeded it, but everything else would be up to the JGC.

The club was all a twitter and began to draw up designs. They decided to start with something simple.

2020Layout-Hill Cover1

They tastefully placed a few rocks and shrubs.

2020Layout-Hill Cover 3

Next they wanted to sprinkle some flowers on the hill, but the club was torn. What flowers do you plant? Do you go with some wildflowers like daisies and Queen Anne’s lace? Mrs. Crosby was aghast that club members would be so boring and ordinary. This was THEIR hill and they should make it spectacular! She had pictured ornamental trees with little beds of exotic plants. It was pointed out that the climate was not good for those kinds of plants, but what about some tasteful plots of petunias or pansies?

This debate is still continuing, so for now the hill just has rocks and shrubs on it.

2020Layout-Hill Cover 2

***EXTRA! EXTRA! READ ALL ABOUT IT! A RULING HAS BEEN MADE IN THE PAVING DISAGREEMENT! THE LAST CREW HAS BEEN GIVEN PERMISSION TO CARRY ON WITH THEIR WORK! NOBODY ARGUED FOR MORE GREEN SPACE BECAUSE THEY WERE TOO BUSY ARGUING OVER ORNAMENTAL TREES AND PETUNIAS!****

That was the headline that  was splashed across the entire front of the Jayville Sentinel the morning that the paving crews showed up to finish up the Main Street area of town. To be fair, the editor of the paper wasn’t very good so technically those were the only words on the front of the paper that morning. The second page had an expose on Mrs. Crosby and an illicit deal she made with an ornamental tree dealer from the city. It was quite scandalous!

2020Layout-Paving Access Rd

Not only did the paving crew have to finish the roads, but they also had to pour the footers and foundations for the buildings that would occupy Main Street. Luckily the owner was experienced in both asphalt and concrete.

2020Layout-Main Street Foundation

The railroad company was very happy with the care that was taken to protect their track. After all, this track would run through the middle of town so that added an extra bit of trickery for the paving guys.

Everything came together and the foundation looked good.

2020Layout-Main Street Concrete

The timing worked out perfectly so that just as the landscapers were rounding Dead Man’s Curve, the concrete had cured on Main Street. The village could now be landscaped as well. The road salt buildings were emptied and all of the rough landscaping was done.

2020Layout-Town Landscaping

2020Layout-Northern Line Landscaping

Posted in model trains, N Scale Train, Trains | Tagged , , , , | Leave a comment

Sewing Room Projects

Sewing Room Furnished 2 4-19-20

I can’t even begin to tell you just how happy I am since getting my new sewing room put into place. I still have a list of projects that I’ve asked Jay to work on, but I wanted to show you the projects he has completed for me so far.

The first one was the most important: fitting my sewing machine into the new cabinet. It’s not a brand new cabinet. My dad bought this for my mom as a Christmas present about 20 years ago, but when she bought a new sewing machine last month it wouldn’t fit into this cabinet. The cabinet is made of press board so there wasn’t any hope of really modifying it. I ended up trading her for the desk that she had originally brought back from NC for me to use in my new sewing room.

Living Room 1-9-20

This desk sat in my library for six months and then was transferred to the living room after Christmas. My dad has modified it and her new sewing machine now sits nicely in it. In the meantime, I had the other cabinet sitting in my library.

Sewing Cabinet 1 4-12-20

The cabinet itself isn’t spectacular, but the lift that is in it is quite nice. I told Jay that the lift alone was worth more than the rest of the cabinet put together. Please note that I have the cabinet resting on a carbon monoxide detector (still in the box) because when my parents were removing it from their house one of the plastic wheels snapped off.

Before we moved the cabinet into the sewing room I had Jay take a look to see if he would be able to make my sewing machine fit in the cabinet.

This is my sewing machine:

Singer Merritt 2404

It was my grandmother’s and when she passed away I got it. This is a cast iron body with actual metal parts on the inside. I love it because I don’t have to worry about some silly electronic thing going wonky and causing the machine to stop working. If one of these parts break Jay should be able to either fix it or re-make whatever part I might need. The problem is that it sits on this base that is also part of the carrying case. The plastic base protects the metal gears and rubber drive belts underneath. Those have to be able to be cleaned and greased every now again so I need access to them.

Sewing Cabinet 3 4-17-20

The base was too wide and too long for the opening in the cabinet. Again, we can’t modify the cabinet because it’s press board and honestly it would not be worth it. I thought that maybe if we had to I could remove the lift mechanism and have Jay build me a sewing table according to my needs.

After looking at it he decided that he could build an insert for my machine to sit in, instead of having it sit in the plastic base.

Sewing Cabinet 6 4-17-20

Originally he was going to put hinges in the wooden base so that I can tilt the machine back for oiling (like I do now in the plastic base), but the hinges didn’t clear the back so that wasn’t good. I told him that as long as I can lift it out I would be fine.

The next issue I needed him to modify on this insert was the gaps in front and behind the machine. He added some thinner pieces of wood to the edges.

Sewing Cabinet 7 4-17-20

The gaps would have caused all kinds of problems with pins getting stuck in them as I was trying to sew, or the fabric catching on it. Who knows what would have happened. I didn’t care about the open area to the right of the machine because I was already used to having an open area on that side. My biggest concern is everything to the left of the stitch length dial. Jay made it as flush to the top of the cabinet as possible while still allowing me to access my bobbin.

Sewing Cabinet 8 4-17-20

I am very happy with it! I sewed on it over the weekend and didn’t have any issues. The wooden insert is bolted to the cabinet so even if I run the machine fast (like when I wind a bobbin) the machine didn’t jump or move. So far, so good!

The next project Jay built for me was a platform on wheels for my cutting table.

Cutting Table Platform

I am 5’10” tall and this is just a regular plastic folding table. If I spend any length of time bent over it my back isn’t happy. Now it’s at a comfortable height for me and if I need to have access to all four sides I can simply roll it out into the middle of the room!

Cutting Table Platform 2

It’s not fancy, but it’s functional. Just like me.

The last Jay-made project I want to show you concerns my chair.

If you refer back to the first picture in this post you can see that I originally had the wooden kitchen chair that I had been using when my sewing room was upstairs. This chair did not work with the cabinet, though. It was too short. I brought my office chair downstairs and was using that, but it was still a bit too short. So I ordered an inexpensive drafting chair from Amazon. It arrived the other night, but after assembling it we realized it was just a bit too tall even at its shortest adjustment. *sigh* I was beginning to feel like Goldilocks.

Luckily I am married to a very talented and ingenious man. He took the chair apart and removed a metal insert that gives it a little more height, but that also keeps the seat attached to the base. He glued some oak scraps together to form a big enough piece that he would be able to put in his lathe and turn it down to the correct round dimension. Then he inserted it and had me try it.

Sewing Chair

It works great! I’m going to try it out for a little bit, but he will be able to modify it a little more if needed. Woo-hoo!

Here’s a slightly better picture of my oak insert:

Sewing Chair Modification

I can’t wait until this weekend when I can spend a big chunk of time happily sewing away in my beautiful room!

Posted in Remodeling, Sewing, Wood Work | Tagged , , | Leave a comment

Sewing Room (Mostly) Finished!!!

Two weeks ago when I posted about my sewing room I had just prepped the trim for painting.

Sewing Room Supervisor's Perch

Actually, to be fair, this picture shows the painted trim. From far away it doesn’t look too bad. As I stood and stared at it, though, I didn’t like how it looked.

Sewing Room Painted Trim 4-5-20

It was Palm Sunday and I suddenly had a bit of a quandry. I had purchased a gallon of expensive paint that was on the ‘Mis-tint’ rack at Lowe’s. It was a peachy tan color. Since it was only $9 instead of the original $30 I thought I could doctor it up with some dark chocolate paint that I had at home. I figured that would be enough to darken it up to the color that I wanted. After painting the trim I had to decide if I wanted to try messing with it some more, or if I would just bite the bullet and go buy another gallon of paint in a color that I actually wanted.

Sewing Room Painted Trim 3 4-5-20

Looking at it next to the floor really bothered me. It was early afternoon and I just wanted to get this project done. Then I remembered something I had read on a blog that I follow and decided to take the technique and twist it a bit.

Jen (her blog is Epbot and is great) and her husband, John, used to be professional painters/faux finishers. Last month John posted a video on YouTube that showed you how to get the look of wood grain using just paint, glaze and stain. I had watched it during my lunch break at work without the sound, so I was going by memory of what he had done. I decided that maybe if I just threw some stain on the paint and let it sit that it might actually darken to the color that I wanted. (I’m an accountant, not a chemist so if you’re having a scientific fit right now just chill… it all comes out in the end).

Jay gave me a scrap piece of wood that I painted, and once it was dry I threw on three different colors of oil based stain and let it sit for about an hour. When I came back I wiped it off and found the color that I thought would work. However, because it’s oil based it had kind of turned gummy. I showed Jay and told him that my plan of attack was going to be to start in one corner of the room and work my way around. When I got back to where I started then I would wipe off the stain and see how the trim looked. I would play it by ear.

I grabbed my can of stain, a bunch of lint-free wiping cloths, my nitrile gloves and some canned cat food trays for the soiled cloths. I had no hope that this was really going to give me anything good, but I didn’t want to buy another gallon of paint. I would just tolerate whatever happened with the stain. I wiped it on and started to spread it around on the trim. Then I stopped. I looked in disbelief. I spread some more stain on the trim a little higher. I really liked the results I was getting and decided that I was NOT going to wipe any of this stain off. Let me show you what I was seeing…

Sewing Room Finished Trim 4 4-5-20

I was getting the look of wood grain without really trying. I had finished around the doors when Jay came in and looked. He was amazed.

Sewing Room Finished Trim 2 4-5-20

It even looks good close up.

Sewing Room Finished Trim 5 4-5-20

When you walk into the room it looks like I refinished the woodwork. It’s almost a walnut-looking wood now, but I’m so glad that I cheaped out and decided to just make do with what I had in the house.

Sewing Room Finished Trim 4-5-20

Not all of it is perfect, and looking at these pictures I see spots I wish I had touched up, but it’s okay because most of it will be hidden by furniture.

Since this was oil-based stain I wanted to give it plenty of drying time before I did anything else in the room. So while the trim was drying I worked on the next project: outlet and switch plate covers. I had looked all over for something that I liked. After all, I didn’t want to put boring outlet covers in this room. When I couldn’t find anything that I liked I decided to make my own. Yes, this is often how I get myself into trouble.

Sewing Room Finished Outlet Cover

I think they turned out pretty good! Not only are they sewing themed, but that’s a picture of my actual sewing notions.

Sewing Room Finished Switch Plate

This one didn’t turn out quite so good. I tore the tissue paper while trying to modge podge it to the cover. See the pins to the left of the switch?

ceramic-pin-dish-10-29-16

It’s the magnetized pin holder that Jay helped me make from a thrift store find a few years ago. I used the same picture for all of the covers in this room, but you could easily have a different one on each outlet if you wanted. I took pictures so I’ll put up a tutorial later.

Once those were installed, the trim was dry and the new duct covers were installed I just had to do a last bit of cleaning before moving things in.

Sewing Room Finished Wall 4-11-20

Sewing Room Finished Wall 2 4-11-20

Sewing Room Finished 4-11-20

I am so happy with how this room turned out!

Let’s get some furniture in there!

Sewing Room Furnished 3 4-19-20

I don’t have everything in here yet. Jay still has to install my wall-mounted ribbon spool holders, the wall-mounted TV holder, and he just finished building the platform to raise my cutting table to a better height (it’s the white table that you see in the picture with the batting on it). I’m 5’10” so I would like a little more height to comfortably cut fabric.

Sewing Room Furnished 2 4-19-20

As you can see my Inspector General showed up to make sure everything was in its proper spot.

Sewing Room Furnished 4-19-20

I’m using blanket storage bags to store my fabric. I’m hoping it will keep the dust off of it and maybe protect it a little more. Since it’s right by the window I should probably cover it with something to keep the sun from fading it.

I decided not to put the blinds back up.

Sewing Room Curtain Rod 4-18-20

I purchased a fancy curtain rod and used one of my lace curtains.

Sewing Room Window 4-18-20

During the day I have to make sure it’s tied back. Otherwise, somebody gets grumpy.

Sewing Room Window Bob 4-18-20

I’m not kidding, either. The other day I was getting ready for work and Bob was sitting in the hallway whining. I remembered that I hadn’t tied the curtain back yet, so I headed into the sewing room. He ran ahead of me and was on the perch before I could get the curtain pulled back. He was whining because he didn’t want to look through the curtain! He’s not spoiled!

Let’s do some before and after pictures, okay?

I spent all weekend in there and loved it! The overall footprint is smaller than what I used to have for my sewing room…

Sewing Room - Christmas 2015

… but the head space is so much better!

Posted in My House, Remodeling, Sewing | Tagged , , | 2 Comments

N Scale Layout- Road Work

Jay has really enjoyed working on this layout. He hasn’t actually told me so, but I can tell because I can hear him singing, “I’ve been working on the railroad all the live long day.” It’s so cute! He’s been having to keep that frame of mind lately as he’s been working with road crews.

2020Layout- Road1

If you’ve ever dealt with a union then you know how it goes… only one guy can lay down the masking agent. Then they have to take a 20 minute break. After that the second guy can come through and take measurements to make sure the first guy laid everything down correctly.

2020Layout- Road2

Once that has been done the second guy confers with a third guy to verify that it matches the blueprint. I could keep going, but you all know that what it boils down to is a quick and easy job ends up taking six times longer and costing 30 times as much as it should have. That’s why you’ll see that this was done in different stages due to union rules.

Once the thirty people had signed off on it, they laid the base layer.

2020Layout- Road Paving1

2020Layout- Road Paving2

At this point it took three days to figure out which crew member was responsible for not ordering enough product. The guilty crew guy called his union rep and they held a meeting with HR and management where it was decided that for his punishment he would get a stern look and a disapproving finger-wagging. Luckily they were able to get this resolved quickly and finished laying the base layer four days later.

2020Layout- Road3

After the masking agent was removed it was quitting time.

Not only did the road crew have to pave roads, but they were also in charge of the crossings and parking lots.

2020Layout-Parking Lot Paving1

As the roads were being paved Jay kept busy by painting the rest of the layout. At this point I had stolen the chocolate icing paint and diluted it with a peachy-tan color. I used it in my sewing room, but there was a LOT left over so he’s using it here.

There are roads all over the layout.

2020Layout-Road Paving3

2020Layout- Road Paving4

Once the base layer was settled and ready, the road crew went back and asphalted everything.

2020Layout- Road Asphalt1

2020Layout- Road Asphalt 5

2020Layout- Garage Building

As the first crew was asphalting, a second crew started to do some connecting work on other parts of the road.

2020Layout- Road Asphalt3

2020Layout-Road Paving5

2020Layout- Road Paving6

The union reps had to be called in again when two different crew guys insisted that it was their job to do a certain part of the paving. They made a mess arguing with each other. A third crew was called in to fix their mess.

2020Layout- Rock Face 3

This third crew did such a good job that they were hired on to prepare for the paving of a second parking lot and a strip mall.

2020Layout- Parking Lot Paving 3

This area required some additional structure beneath the base layer.

2020Layout- Parking Lot Paving 4

The developer expects there to be heavy traffic and lots of activity in this area.

2020Layout - Parking Lot Paving 5

After the code officer signed off on the additional structural requirements the crew prepared for paving.

2020Layout- Parking Lot Paving 6

At this point a cease-and-desist order came from the first two road crews because they felt they had been cheated out of the job. We are waiting for the case to undergo arbitration. In the meantime, some of the citizens of the town started a petition to try to keep the developer from paving this area. They feel that it should be fenced and made into a dog park or an art park. They are unhappy with the amount of green space that has been lost. The town council has agreed to discuss this at their next public meeting in two weeks. So we are at a standstill until these two things are resolved. *sigh*

Posted in N Scale Train, Trains | Tagged , , , | 1 Comment

A Yarny Tale

Once upon a time there was a skein of yarn named Blueberry Swirl, but his friends called him Blue.

Blueberry Swirl Sweet Roll

Blue sat on the store shelves with his friends and family, waiting for the day when he would be purchased and used for an extremely important project. From his place on the shelf he could see the free patterns that the store allowed customers to take. There were hats, scarves, sweaters and shawls. As he waited Blue dreamed about what type of garment he would be used to make.

Some days he adorned the head of an Olympic skier as the Press interviewed the gold medal winner about his trip down the mountain. Little Blue would grace the magazine covers of all the most widely-read sports magazines.

Gary in a Crocheted Hat

Other days he dreamed about being made into a beautiful shawl that would appear in the latest blockbuster motion picture. He would be part of the costume tour that would travel around to all of the most important museums where people could look at the shawl and marvel at its beauty.

Pauline's Lost Skulls Shawl 11-29-19

Then there were times when he could imagine himself being used for a cardigan. Not just any cardigan, though, this cardigan would be worn by the smartest scientist in the world who discovered cures for a lot of terrible diseases.

Droof in her Warm Embers Cardi

Blue knew that he was destined for greatness. His future wouldn’t consist of being part of a blanket that a pet would shed all over, nor would he be a baby blanket to be drooled upon and soiled. He refused to even consider that he would become part of a garment that would end up at a thrift store, unpurchased and unloved.

The day finally arrived when blue was purchased and taken home. The woman who purchased him and a few of his brothers placed them in a room with many other skeins of yarn. Blue didn’t want to get too friendly with the others as he didn’t expect to be there for long. Remember, he was destined for greatness.

Yarn Mess 5-18-19

It bothered him a bit when he would overhear the others talking about being included in blankets. Maybe THEY would be blankets, but not him. He had bigger plans. He had more important plans.

One day the lady came back and made a selection of blue yarns, including Blue. This was it! This was his big moment! With heightened anticipation he watched as the lady used another skein of solid blue yarn to crochet a long chain. Hmmm… that was too long for a scarf. Maybe it was a shawl. Then he noticed that the other yarn was being crocheted into ripples. One of the free leaflet patterns he had stared at for months was a rippled afghan with a baby on it. Oh no! It couldn’t be…

Blueberry Swirl Blanket

As the lady crocheted him into ripples that matched the other two yarns’ ripples, he began to get nervous. Out of a bit of desperate hope he tried to casually strike up a conversation with his new neighbor. “Uh, hiya. My name is Blue. Do you happen to know what we are being used to make?” The other yarn was a light blue solid yarn who had been sitting around for a while. “Hi! My name is Frosty! I don’t know, but I’ve heard talk of blankets and little boys. I can’t wait! Even though we will be a blanket we might be used as a fort, or as a ghost or as a cape. It will be great!”

Blue was so depressed about the prospects of being jerked around by a rowdy little boy that he didn’t try to carry on any more conversations. When the lady was finished crocheting the blanket (yes, his heart sank when he realized for sure that’s what he had been used to make) she tossed it in the laundry, and once dry, bagged him up.

Blue stopped dreaming about greatness. He had given up. There were so many great things he could have been part of, but instead he was going to be a dirt magnet. He would be soiled, walked on, and treated like any other blanket. His life was going to be miserable.

After living in the bag for a while he suddenly realized they were being transported somewhere else. The bag opened and the blanket was lifted out. He heard machines, smelled a weird smell, and heard somebody say, “This is for you.” He looked up to see a little boy in a hospital bed with big scared eyes reaching for him. As the boy rubbed his face into the blanket another voice said, “Whenever you get scared you can wrap your blanket around you and know that you are being hugged and loved. Love was put into every stitch of this blanket as it was being made for you.”

Project Linus Blanket #24 7-16-19

The little boy held the blanket close and wouldn’t let it go. Blue realized that he WAS part of an important piece. He may not ever be seen on the big screen or in magazines, but to this little boy he was the most important thing in the world. And he was loved more than he could ever imagine. Yes, Blue knew he was destined for big things and he was right.

ProjectLinus.org

Posted in Blankets, Charity, Crochet, Project Linus | Tagged , , , , , | 1 Comment