

I can’t even begin to tell you just how happy I am since getting my new sewing room put into place. I still have a list of projects that I’ve asked Jay to work on, but I wanted to show you the projects he has completed for me so far.
The first one was the most important: fitting my sewing machine into the new cabinet. It’s not a brand new cabinet. My dad bought this for my mom as a Christmas present about 20 years ago, but when she bought a new sewing machine last month it wouldn’t fit into this cabinet. The cabinet is made of press board so there wasn’t any hope of really modifying it. I ended up trading her for the desk that she had originally brought back from NC for me to use in my new sewing room.

This desk sat in my library for six months and then was transferred to the living room after Christmas. My dad has modified it and her new sewing machine now sits nicely in it. In the meantime, I had the other cabinet sitting in my library.

The cabinet itself isn’t spectacular, but the lift that is in it is quite nice. I told Jay that the lift alone was worth more than the rest of the cabinet put together. Please note that I have the cabinet resting on a carbon monoxide detector (still in the box) because when my parents were removing it from their house one of the plastic wheels snapped off.
Before we moved the cabinet into the sewing room I had Jay take a look to see if he would be able to make my sewing machine fit in the cabinet.
This is my sewing machine:

It was my grandmother’s and when she passed away I got it. This is a cast iron body with actual metal parts on the inside. I love it because I don’t have to worry about some silly electronic thing going wonky and causing the machine to stop working. If one of these parts break Jay should be able to either fix it or re-make whatever part I might need. The problem is that it sits on this base that is also part of the carrying case. The plastic base protects the metal gears and rubber drive belts underneath. Those have to be able to be cleaned and greased every now again so I need access to them.

The base was too wide and too long for the opening in the cabinet. Again, we can’t modify the cabinet because it’s press board and honestly it would not be worth it. I thought that maybe if we had to I could remove the lift mechanism and have Jay build me a sewing table according to my needs.
After looking at it he decided that he could build an insert for my machine to sit in, instead of having it sit in the plastic base.

Originally he was going to put hinges in the wooden base so that I can tilt the machine back for oiling (like I do now in the plastic base), but the hinges didn’t clear the back so that wasn’t good. I told him that as long as I can lift it out I would be fine.
The next issue I needed him to modify on this insert was the gaps in front and behind the machine. He added some thinner pieces of wood to the edges.

The gaps would have caused all kinds of problems with pins getting stuck in them as I was trying to sew, or the fabric catching on it. Who knows what would have happened. I didn’t care about the open area to the right of the machine because I was already used to having an open area on that side. My biggest concern is everything to the left of the stitch length dial. Jay made it as flush to the top of the cabinet as possible while still allowing me to access my bobbin.

I am very happy with it! I sewed on it over the weekend and didn’t have any issues. The wooden insert is bolted to the cabinet so even if I run the machine fast (like when I wind a bobbin) the machine didn’t jump or move. So far, so good!
The next project Jay built for me was a platform on wheels for my cutting table.

I am 5’10” tall and this is just a regular plastic folding table. If I spend any length of time bent over it my back isn’t happy. Now it’s at a comfortable height for me and if I need to have access to all four sides I can simply roll it out into the middle of the room!

It’s not fancy, but it’s functional. Just like me.
The last Jay-made project I want to show you concerns my chair.
If you refer back to the first picture in this post you can see that I originally had the wooden kitchen chair that I had been using when my sewing room was upstairs. This chair did not work with the cabinet, though. It was too short. I brought my office chair downstairs and was using that, but it was still a bit too short. So I ordered an inexpensive drafting chair from Amazon. It arrived the other night, but after assembling it we realized it was just a bit too tall even at its shortest adjustment. *sigh* I was beginning to feel like Goldilocks.
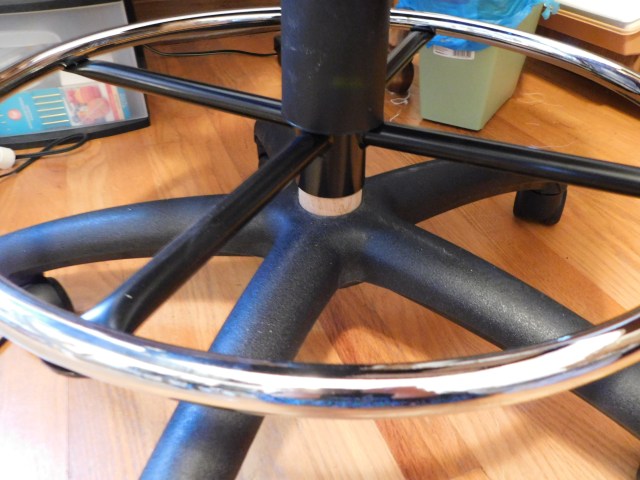
Luckily I am married to a very talented and ingenious man. He took the chair apart and removed a metal insert that gives it a little more height, but that also keeps the seat attached to the base. He glued some oak scraps together to form a big enough piece that he would be able to put in his lathe and turn it down to the correct round dimension. Then he inserted it and had me try it.

It works great! I’m going to try it out for a little bit, but he will be able to modify it a little more if needed. Woo-hoo!
Here’s a slightly better picture of my oak insert:
I can’t wait until this weekend when I can spend a big chunk of time happily sewing away in my beautiful room!
