A Dog Clock

I gave you a peek at my latest woodworking project:

Dog Clock 1 Sanded

One of the ladies I worked with at my previous job will be retiring this week. When I was still working with her I had showed her a picture of something in my family room, but she had zeroed in on my clock:

My Cat Clock - 2015

This was a Christmas gift from Jay a few years ago. She absolutely loved it and said that Jay could make her a dog clock for her retirement gift. A few weeks ago, I asked Jay if he could draw up a dog clock for my friend. I told him that she loves spaniels, so this was what he came up with:

Dog Clock 2 Sanded

Jay sent a picture around to show a few people and his mom thought it was for her. Well, it wasn’t that hard to do another one, so he quickly ran the program again. Thus, I am working on two dog clocks.

I wanted to go for more of the natural wood look, so I did a natural stain.

Dog Clock 2 Base Stain

It brought the grain out a little more, but the dog was still getting lost. So I asked Jay to cut another piece of pine and rout out some lines so that I could test stains.

Dog Clock Stain Sample

After these dried I consulted with him and we picked the darkest color on the right.

Dog Clock Stain Difference

What a difference that makes! A few coats of poly and that dog will be winning ribbons for Best of Show! I liked the other dark color on my stain sample, though, so I decided to stain the other dog with it instead of making them the same color.

Dog Clocks Stained 3-25-19

You can’t see a big difference in color, but when you look up close you can see a big difference in the wood. It has a lot of varied patterns and some weird grain stuff going on. Despite all of that, I think that they turned out really nice. Maybe once they are completely dry I can set them up for a non-glare picture.

Posted in CNC Router, Wood Work | Tagged , , , | Leave a comment

Project Linus Blanket #17

A few weeks ago I gave you a tease of this blanket:

Project Linus Blanket #17

Have you been able to picture it in your head? Let’s see how close you were.

Project Linus Blanket #17 – “Monsters Inc”

Project Linus Blanket #17 - 3-17-19 Monsters Inc

I used my LED sewing light to try to get a truer picture of the colors in this blanket. Technically they are called Kiwi Green and Royal Blue.

I’ve been calling this Monsters Inc because the colors remind me of their logo and the little green guy, Mike Wazowski:

monsters-inc-3d-poster1

I wasn’t sure how the big sections of variegated yarn would look with the solid stripes.

Project Linus Blanket #17 3-17-19 Detail

When you look at the picture of the full blanket the variegated parts actually remind me of the snow you used to get on your TV before cable and satellite eliminated that issue.

I still have to weave in the ends, but I’ll probably do that once I have another blanket or two that also requires it. I like to pile up three or four of these before weaving in the ends, laundering the blankets and dropping them off to the organization.

The next blanket is in the queue…

Posted in Blankets, Charity, Crochet, Project Linus | Tagged , , , | Leave a comment

Dresses for Missions – #40

I did something unusual and shared a progress picture last week.

Dress #40 In Progress

Were you able to picture it in your mind? I know that my mom did, but for the rest of us who are challenged in this aspect:

Dress #40 3-16-19

I was a little worried that the orange would be TOO orange, but it actually goes quite nicely! I probably should have used a dark pink for the straps, but this purple kind of goes, too.

Dress #40 - Hem

I added the typical lace at the bottom, but I didn’t gather the ruffle like I have previously. Mostly because I had already started to pin the ruffle to the body of the dress when I realized that I hadn’t run any basting stitches. I could have unpinned it at that point and basted it, but I didn’t want to. So I did a rough gathering-fold with my fingers. I think it turned out okay.

Dress #40 -Neck

I’ve had this embroidered daisy ribbon for a while and felt that it would look good on this dress. Just a little something to dress it up a bit. They kind of get lost, but I like how it brings out the yellow in the rest of the dress when you look at it up close.

What do you think?

I’m still on track to make one dress a month! I’ve managed to catch up!

Posted in Charity, Dresses for Missions, Sewing | Tagged , , | Leave a comment

Jewelry Armoire Update – 3-15-19

In my previous post regarding this project I was a little grumpy. So after I was finished writing the post I sent myself to bed. True story. (I’ve put myself in time-out before, too)

Kerry Asleep

As promised, I did work on it over the weekend, but got grumpy about it again. *sigh*

It’s not so much the cabinet itself that makes me grumpy. It’s the fact that I have giant hands and can’t comfortably sand or stain the shelves (or in between them). I have banged my hands all up just trying to get it decent.

Finally, though, the sanding was finished!

Jewelry Armoire Sanded 3-14-19

I know that you can’t tell, but it is prepped and ready for stain.

Jewelry Armoire Side Sanded 3-14-19

It was as good as it was going to get.

Out came the gloves and the can of stain.

Jewelry Armoire Stained 3-14-19

I’ll admit that I wasn’t overly concerned with the bottom of the shelves. Technically very few people should see them. Also, please refer to my note above regarding my giant man hands and the limited space in which I had to work.

Jewelry Armoire Side Stained 3-14-19

I think that it looks good. The layers of polyurethane will enhance it and improve the look. So in the end it will be beautiful.

In the meantime, here’s a sneak peek at my next finishing project:

Dog Clock 1 Sanded

Posted in Wood Work | Tagged , , | Leave a comment

Sewing Projects Update

In the past there have been numerous projects that I’ve waited to post about until they were completed. Well, I seem to have so many different projects going right now that if I don’t post them little-by-little it will take forever to post about them.

Tonight is a sewing night. I’ve had a few grumpy days so I decided to spend time in my happy place: my sewing room.

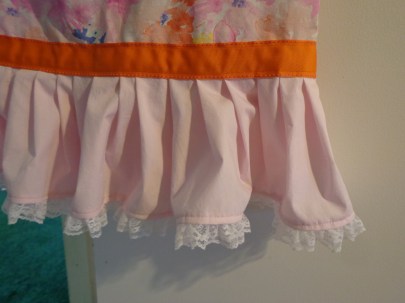
I have Dresses for Missions dress #40 in progress:

Dress #40 In Progress

This was another cut of fabric that I bought at Hobby Lobby for $2 per yard. You can see that I also have the light pink for another ruffle. I’m going to use the mauve-ish purple binding for the straps, plain white lace around the ruffle, and the orange ribbon between the dress body and ruffle. I wanted to use a blue lace for the ruffle, but I only have baby blue lace which is a bit too dark and I think would look goofy with the colors. I really wish that I had orange or dark purple lace, but I don’t. So I’m using what I have on hand.

The next step is to sew the lace on the ruffle. Then the gathering process begins. I do it all by hand so that is an entire night’s worth of sewing by itself. Hopefully I can get back to it this weekend.

I was reading our church’s newsletter when I read a blurb that said Dresses for Missions will be sending a bunch of dresses down to our sister parish in Mexico. I don’t get a chance to meet with the other ladies in the ministry because they meet either during the day or at times when I have other obligations (like choir), so this was the first that I’d heard about it. Armed with that knowledge I think that I’m finally going to bust out this pattern:

Dress Pattern

I want to make sure that the teenagers and possibly some of the women will be able to receive a dress, too. It will require some different fabric (I don’t think many women would want to wear the really girly patterns that I have in my stash), but I want to trace the different sizes off and make S – M – L- XL versions. I will make the longer version since that should fit women of varying heights the best. Also, I would think that they would be more conservative since they are Catholics. So we’ll have to see how that goes when I can get to it.

In the meantime, those aren’t the only projects that I have going. At some point I want to show the the steps that I am going through to make Jay a new lunch box. I keep buying him the same type of lunch box, but they fall apart so easily.

Jay's Old Lunch Box

This past fall I purchased some waterproof canvas to make a new box. I’m hoping to be able to salvage the majority of the zippers on this box since they are all in good shape. I also hope to reuse the shoulder strap. We shall see how far I get with that one!

About a month ago I ran to Goodwill and looked to see what they had for flannel sheets. I thought that if I could find a reasonably priced set then I could make some more receiving blankets for the Dresses for Missions baby boxes. I found this:

Sheet for Blankets

Size: Queen (full and fitted sheets plus pillow cases)

Price – $4.99!!!

You guys, this isn’t a cheap set of sheets, either.

Woolrich Tag

I would be surprised if these had been used even once. They still look brand new! If they had been King size I would have used them for our bed instead of cutting them up. They are a nice thick flannel that will work nicely for blankets. Again, they are so nice that I haven’t been able to bring myself to cut into them yet. I’ll get there… just give me time.

I think that I mentioned in my post about replacing the zipper in my winter coat that I have to replace the zipper in my windbreaker, too.

Windbreaker Waiting

This jacket is a great jacket. It’s high quality and despite the fact that it’s 19 years old it’s still in great shape. Would you like to read a funny story about this jacket?

When I was in college I worked as a secretary for the buildings & grounds department of a gated educational community in the area where I grew up. As part of my daily duty I would walk the 1/4 mile (maybe?) down to the main administration building to pick up the mail and any work orders that we had waiting for us. I would then walk the 1/4 mile back up the hill towards the maintenance buildings located across the road from the main campus. I was allowed to take a golf cart, but in the summer it was a beautiful walk and I enjoyed the time in the fresh air. One day, though, it was a bit cloudy and was threatening rain. I took my umbrella and tried to hurry back before the rain started. However, as I picked up our mail I was told that I had to take a rather large box back with me. They didn’t tell me what was in it, but I placed the mail on top, hung the umbrella off of my wrist, and carried this box (which I could barely get my arms completely around) back up the hill towards my office. Guess what? It started to rain when I was halfway back. By the time I got into the office I was quite wet, but the box had survived the trip. I took it into the supervisor’s office and went to dry off. As I was wringing the water from my hair he walked through my doorway carrying this bright blue windbreaker. Yes, I had managed to get drenched carrying a box of rain jackets/windbreakers that arrived completely dry.

Finally, with everything else that I’ve managed to put on my To Do list I also added this:

Complete Crochet Course Book

This had been highly touted by a woman that I watched on YouTube, so I ordered it. It really is great! It has so much information in it from the tools to yarn to a bazillion different stitches and even how to read a pattern (both written and diagram). This is my bedtime reading. So far I haven’t had dreams about crocheting, but I figure it’s just a matter of time.

Posted in Charity, Crochet, Dresses for Missions, Sewing | Tagged , , | 1 Comment

Jewelry Armoire Update 3-8-19

Jewelry Armoire - Stained Doors - Inside

Last week I showed you the inside of the jewelry armoire doors. They turned out okay, but I think that the front of the doors turned out even better. Take a look…

Jewelry Armoire Finished Doors 3-7-19

I looked for the hardware to see if I could show you how it looked, but I have no idea where Jay has them stashed.

Jay transferred the cabinet body to my bench for me this week.

Jewelry Armoire on Bench 3-7-19

I started sanding on it last night, but then I had to stop.

I was slightly grumpy and really didn’t feel like being in the cold basement sanding anything. So I stopped. After all, I knew that if I kept going while being grumpy then I wouldn’t do the best job that I could. I would call it good enough and then later I would be unhappy with it. So, I stopped and came upstairs. I will work on it this weekend. I promise.

Jewelry Armoire Body 3-7-19

This is going to require a lot of patience on my part because the shelves are very close together so I am going to have a difficult time working on them. *sigh* That’s why I need to be in a better mood to work on it. The weather is suppose to improve this weekend (the temperature is supposed to be above freezing! It’s a heat wave!!), so I will be a little happier working in the basement.

Posted in Wood Work | Tagged | 1 Comment

Zipper Woes

This was the culprit:

Zipper Culprit 3-2-19

Last week my zipper on my winter coat kept splitting and I realized that the zipper pull had been pulled apart so it wasn’t correctly aligning the zipper to close it. I asked Jay to grab the pliers so that we could fix it. Well… sometimes it sucks that he’s so smart. As soon as he used the pliers to push the pull back together he said, “Uh-oh.” The zipper pull was shot. There was no way it would work correctly.

This upset me because that was the zipper that I had replaced two years ago. I’d only managed to get two years out of that zipper!! I really didn’t want to replace it again. So Jay told me to just go buy a new coat. *sigh* Fine!

During my lunch period I decided I would take a quick look online to see what might be available at some of the local stores. What I saw had me irritated. The warmer coats with hoods had fur-trimmed hoods (which I didn’t want) and were $100. The other style that I found were the puffy coats that I DEFINITELY didn’t want. After all, my last name isn’t Michelin. You don’t believe me? This is an example of what I was seeing:

PUffy Coat

“Hello, Mrs. Michelin. Please step this way while you wait for your table.”

Oh, look… here’s an example of a puffy coat WITH fur trim:

Puffy Coat with Furry Hood

That poor girl is stick thin and it makes her look huge. Can you imagine what it would do to a fat girl?

Needless to say, I got irritated and went up to Joann Fabrics after work for a new zipper. There was no way I was going to pay $100 for a coat that I hated. Instead, I decided it would be better to fight with a coat that I loved for a few hours.

And boy, did we fight!

Zipper Out 3-2-19

TWO HOURS. That’s how long it took me to rip out the old zipper. One hour for each side. You see, when I had sewn it in I used little tiny stitches thinking that it would hold together better and I wasn’t planning on ever replacing it. The coat is 10 years old and so I should have been able to get at least 5 years out of the other zipper.

After getting the old zipper out I installed one side of the new one. This time I decided that I would use my Singer 301A to sew it in.

Singer 301A Zipper Sewing 3-2-19

This is a straight stitch machine with a tiny throat plate so the fabric wouldn’t get caught in it. Also, the stitch is a very regular and consistent stitch. As soon as I remembered how to wind a bobbin I was in business.

Singer 301A Foot 3-2-19

I kept catching my hands on the pins. And I had to re-sew one part of it after I realized that I had caught the button flap in it, so I unpicked it and sewed it back up. *sigh*

Half Zipper Sewn In 3-2-19

Finally, though, I had one side sewn in! I wasn’t happy about having to use a dual separating zipper. I prefer the single zipper pull zippers, but this zipper was rated for use in ski jackets and ski pants, so I figured that it had to be somewhat rugged. After all, I’m really hoping that this zipper outlasts the rest of the coat.

CLose Up Zipper 3-2-19

I think that I did an okay job of sewing it in.

New Zipper Installed 3-2-19

After a lot of monkeying around and re-pinning I finally got the other half sewn in. It’s not perfect, but it’s good enough. As you can see, this coat is in really good shape. There are dirty spots on the white parts, but that’s about it. I bought this coat in 2008 at the Bon-Ton for $80. It keeps me warm and fits nicely. I really didn’t want to throw it away since it was still in such good shape. I guess it was worth the 4.5 hours to replace the zipper. After all, the closest coat that I could find to something I would somewhat like was $139. Yikes! So for $14 (the cost of the two zippers I bought… in case the one wasn’t the right length) and 4.5 hours I have a coat that I still love and a blog post.

Posted in Sewing | Tagged , | Leave a comment

WIPS – Crochet Projects

A few posts ago I mentioned that this year is the year of Crochet.

Somehow I have managed to accumulate a handful of WIPs (Works In Progress) that are beginning to drive me crazy. Let me show you what I mean.

Crocheted Tree Garland:

crocheted garland

I am currently on the last row of my second 10ft section of garland. Of course, once that is finished I need to start on another 10ft section in the hopes of having it ready for the tree this upcoming Christmas.

T-Shirt Yarn Rug:

t-shirt rug 1-28-19

This project has not been touched since I last posted. Mainly because my wrist is finally somewhat healed and I don’t want to injure it again. What I need to do is put the wrist brace on that I wear at night (it immobilizes the wrist) and see if I can manipulate the hook enough to work on this project. I need to figure something out!

Project Linus Blanket #17:

Project Linus Blanket #17

I don’t want to ruin the big reveal so here’s a sneak peak at the next blanket. The color isn’t good (it’s a bit yellow), but you can see a little bit of what I’m doing. This blanket gets worked on when I’m sitting in the family room watching TV. That is, when I don’t have a cat on my lap.

chester crochet

One of my next sewing projects will be to make some kind of an ‘envelope’ of sorts that I can place the already made blanket in to protect it from cat hair while I work on it. Since these blankets go to other people I try my hardest to remove all of the cat hair before handing them into the collection site. That includes using a lint roller and going over every square inch of it after it has been laundered. Unfortunately, all you have to do is look at Chester and you’re covered in orange cat hair. Look down… just by reading these words I’m sure she’s managed to shed on you.

Project Linus Blanket #18:

Project Linus Blanket #18

I have a magazine with about a dozen projects that I want to try making (one of which is the rug above). They had this baby blanket that used Lion Brand Ice Cream Big Scoop Yarn and looked really cute. I finally ran into a yarn sale where I could get this yarn at a really good price. Since it will be for a boy I chose the color ‘Blueberry’ and I think it’s cute.

Project Linus Blanket #18 Detail

Every other row is a bubble shell stitch, and you fill in between on the next row with a fan of double crochet. I work on this project in the front living room, typically in the morning when drinking coffee before work. My only complaint about this project is that the skein of yarn isn’t pulling nicely. I tried putting it in my project bag, but it refused to pull from the center. It got all knotted and I ended up taking it out to use. I think it’s just because it had to be squished to fit into the bag.

I do have one finish to show. I received some kitchen towels for Christmas and decided that I didn’t need any more towels in my drawer. So I turned them into hanging towels.

Hanging Towels

This is the first set that I did (and sent to my best friend). I have worked on a second set for myself, but still need to weave in the ends and add the buttons. The buttons that I used for this set were really cute. I think that I might have purchased them at Hobby Lobby a few years ago:

Hanging Towel Buttons

Speaking of Hobby Lobby, Jay and I were there the other day while waiting for the dealership to finish the inspection on his car. I was just walking through the yarn aisle when I felt a thump in the basket I was carrying. I looked to find that a Project Linus blanket had jumped into my basket!

Blanket Yarn

I already have eight blankets kitted up at home, so I definitely did not need another. I explained that to the yarn, but it cried and said how it just wanted a nice little boy to love and cherish it. *sigh* Well, since I’m such a softy I couldn’t say no, so it came home with me. I guess that I now have nine blankets ready to go.

Finally, not that I need any more projects on the list, but I saw this and am DYING to buy the pattern to make one:

Kitty Couch - Annies Crochet

How stinkin’ cute is that?! Annie’s Craft Store was kind enough to send that to my email the other day. I definitely don’t need yet another project waiting in the wings, but I’m so tempted! I know, though, that if I were to spend the money and time making it that the cats would refuse to use it. Currently Chester’s favorite place to sleep is a piece of packing paper from a package that I received a few weeks ago. I tossed the paper on the floor and she claimed it. So I know that this would be completely ignored! Silly cats.

Posted in Blankets, Cats, Charity, Crochet, Project Linus | Tagged , , , | Leave a comment

Jewelry Armoire Update – 2-25-19

Jewelry Armoire 11-18-18

For the longest time this is as far as Karen’s Jewelry Armoire had progressed. After the Christmas rush and the list of projects I had given Jay to work on, he was finally able to get back to it.

Jewelry Armoire 2-2-19

The hinges had to be purchased, but once they had Jay was able to get the doors hung on the cabinet.

Jewelry Armoire - Door Installed

We used off-set hinges so that they don’t show from the outside.

And we gave it feet:

Jewelry Armoire - Foot

At this point we were ready to start finishing it. Actually, that’s my job so I guess that it was ready for me to start finishing it. Except… Jay came home and told me that he had a new finishing table for me. His work place was going to throw it out, but he snatched it just in time.

Table with One Light

It was an old conference table that they no longer needed. It’s 8 ft long and VERY heavy. Since it was a conference table, though, Jay built a new base for it that would raise it up to a height that is more suited for the tall finishing department.

New Finishing Table

It’s not a fancy base, but it works. There will be a shelf installed so that I can store some of my things under there. Isn’t it nice?

So as I got ready to start working on the doors to the armoire Jay realized that only one side of the table was well lit. Being a good husband he got right to work making a new LED light to be installed over the dark side.

Jay Soldering Lights 2-24-19

It’s a simple light: four LED strips, a few jumper wires, and a wall wart. Oh, and the board that it’s installed on and will be screwed to the floor joists above the table.

New Light 2-24-19

Not very fancy, but it works a treat!

With the lighting now more than adequate I could get to work on the doors.

Jewelry Amoire Doors - 1 sanded

The door on the left is sanded. The door on the right has not been touched.

Jewelry Armoire - Sanded door

You can almost feel the smoothness of it from this picture. I spent almost 2 hours on each door, starting with 100 grit and working my way up to 220 grit. One of the doors I actually had to start with 60 grit, but I got it knocked down smooth.

Jewelry Armoire - Unsanded Door

This is the one that required 60 grit to start out. Can you see the roughness? A little elbow grease and persistence (and 2 hours) will remove it.

You will end up with this:

Jewelry Armoire - Sanded Doors

This is the inside of the doors. Fully sanded and ready for stain.

But what color??

Stain Samples

The top piece of wood is pine, which is used for the majority of the armoire. The bottom piece is poplar, which was used for the shelves. As you can see the two different woods took the stain much differently. I asked Jay which he preferred and then opted to go with that choice.

Jay has been designing this cabinet with more of a rustic feel to it, so when he chose the stain I could see how it would work. Also, if you call something rustic then you can forgive the flaws a little easier!

I am only going to stain one side of the doors at a time so that they can dry properly and won’t get marks from where they come into contact with the surface that they are sitting on. I started with the inside to see how it would look.

Jewelry Armoire - Stained Doors - Inside

Not too bad. This is definitely not a showcase piece. It won’t be featured on the front of Fine Cabinetry magazine. However, I do think that it looks a lot like what you would find in an antique shop. When you open up a cupboard and can tell that it’s been used quite a bit and has some stories to tell. Obviously, I’ll have to make up some stories for this one to tell, but I think it will end up looking okay.

Jewelry Armoire - Stain Detail

Here’s another way to look at it… if somebody breaks into your house are they going to suspect that you keep all of your jewelry in what appears to be an older antique cabinet? Well, I guess that if they read this blog they will, but more than likely they’ll be looking for a safe or an actual jewelry box.

So that’s where we stand with the Jewelry Armoire as of today.

Posted in Wood Work | Tagged | Leave a comment

Dresses for Missions – #39

Dress #39

Dress #39 2-20-19

It’s been a few months since I’ve made a dress… I know!

I was actually motivated to make this dress after receiving the fabric for the ruffle:

dress ruffle fabric 1-13-19

This past fall after I gave my talk about this ministry in church I had a few church friends who gave me money to purchase more materials. Right after Christmas I was at Hobby Lobby and found the purple rainbow fabric for $2 a yard, so I used the money given to me to get a few yards. I think it was a pretty good purchase!

Dress #39 Neck Lace

I used the last piece of iridescent lace that I had in my stash for the top decoration. I figure that if you have rainbows on your dress you definitely need some iridescence. Am I right? Yes. For sure.

Dress #39 Hem Lace

I then used the last length of purple lace in my stash for the hem. Actually, I was sweating a little bit because I didn’t think that I had enough purple lace. I thought that I might come up about an inch or so short. Luckily as I stitched and laid it properly along the material I had just enough!

I have more of this rainbow fabric, so I’ll have to figure out how to make it look a little different in the next go round. My goal this year is to make one dress a month. Obviously I’m already behind, so I have one more to make in order to catch up. I think that if I try really hard I will be able to do it.

Posted in Charity, Dresses for Missions, Faith, Sewing | Tagged , , | Leave a comment