Dresses for Missions Update – 11-4-16

Dress #35:

dress-35-10-21-16I was looking through my pile of fabric for dresses and realized that I have a lot of busy material. As I was trying to come up with a dress in my head I realized that I was turned off by the idea of making a ruffle out of the same material and continuing with the busy fabric all over. I thought that maybe I should purchase some solid colors to help accentuate or play up some of the fabric. Yikes! Solid cotton fabrics are not cheap and are hardly ever on the clearance rack. I purchased a pricey yard of material at Hobby Lobby and then decided I would purchase any other solids at Wal-Mart.

Quilt Shop FabricThis daisy print was purchased off of the clearance rack at Hobby Lobby, but I hadn’t really used it yet. You might recognize some of the material from a recent dress, though! I was at work when I suddenly thought of this daisy fabric and I instantly envisioned it with eyelet lace and a golden ruffle. I didn’t quite remember the daisy material accurately so the end product is slightly different than my image, but it’s just as beautiful!

dress-35-hem-detail-10-21-16I REALLY wanted to have a wide eyelet lace to place on top of the golden ruffle, but I didn’t have enough yardage. Then I thought about putting a smaller width eyelet lace on the bottom of the ruffle, but from my quick calculations I would end up being about a foot shy of completing the round. Shucks! So I settled for this pairing, which looks just as nice. Don’t you think? If you’re wondering, yes, I had to hand weave that ribbon through the lace. It was a lot of time spent hunched over, but definitely worth it.

dress-35-neck-detail-10-21-16Then I found a small piece of this lace and knew that I had to use it for the neckline. How perfect that it mirrors the lace below. To break things up a little I used yellow ribbon (even though I didn’t tie it around the ol’ oak tree).

I was a little more excited about sewing this dress until I got to the part where I had to weave the ribbon. That put a slight pause in the process. Well, that and this:

bob-helping-to-sew-10-21-16Bob insisted that he had to lay on my lap while I was trying to sew. He was not impressed that I kept moving. Poor cat! He’s just trying to get a little shut-eye and his momma won’t sit still. Silly momma!

One thing that I also want to show you is my new pin dish:

ceramic-pin-dish-10-29-16Isn’t it great? Last spring I was reading a blog post (and I can’t remember where!) that mentioned an easy gift to make and give is a magnetic pin dish. You just buy a saucer or dish with a concave bottom to allow you to glue a magnet in place. Since then I’ve been on the lookout for the perfect pin dish. It’s a lot harder to find one than you would think!

empty-pin-dish-10-29-16Finally on one of my lunch hour visits to Goodwill I stumbled across this little piece. It has a curved surface so that the pins aren’t just sitting on top as they are actually in a shallow bowl. I ran over to Hobby Lobby and purchased a magnet that I thought would fit.

magnet-in-pin-dish-10-29-16Apparently I should have chosen a smaller one because Jay had to trim the corners so that it would fit. He then hot glued it in place for me. Voila! A magnetic, and pretty, pin holder! Needless to say I quickly tossed the plastic one I had been using in my drawer. I feel so elegant now when I’m pinning!

Posted in Charity, Dresses for Missions, Sewing | Tagged , , , , | Leave a comment

Advent Wreath Stand – Part 2

wreath-stand-church-pews-2If you read the first part of the Advent Wreath Stand build post then you know that Jay and I are using wood that came from the ‘old’ church. Knowing that not only is our supply of this wood limited, and the time in which we have to build this stand, has been slightly stressing me out. My deepest fear is that somehow I’m going to mess it up and the parishioners are going to be highly disappointed that something so precious (their old pews) went to make something so bad.

wreath-stand-arms-glued-and-shapedJay had the arms all ready for the finishing department to work on, so I had to stop stressing and just do my best. Yikes!

wreath-stand-unsanded-and-sanded-armsYou probably can’t tell, but the arm on the left is unsanded and the arm on the right is sanded. I spent three hours working on these arms. I started out using 100 grit sandpaper and worked my way up to 220.

wreath-stand-arms-ready-to-be-stainedI cleaned them up and asked Jay to check them to see if there were any spots that I had missed. Nope. They felt great.

wreath-stand-stain-samples-2Even though we are using oak for the stand we have two different sources of it. The base will be made from oak planks that my dad salvaged and then we have the arms and legs made out of the pews. When testing stains I made sure to test on samples of both. This really isn’t a great picture, but the closest that I could get was the Golden Oak color all the way to the left. The stand might end up with kind of a two-tone look, but I think that will be okay, too. Oak is such a beautiful wood that my goal is to bring out its beauty and highlight it. Hopefully I’ll be able to accomplish that!

wreath-stand-arms-stainedFirst I used a Pre-Stain on the arms. This stuff is similar to using a primer when painting; you are helping to keep the stain from going on in a blotchy manner. The pre-stain is supposed to smooth and even out the stain as it soaks into the wood. Then I used a light touch to apply a thin coat of stain to the arms. If it was too light then I could do another application to darken it.

wreath-stand-arms-with-wood-grainDon’t these look gorgeous? That stain really highlighted the grain and warmed the arms quite a bit. This is the exact look that I had in my head.

wreath-stand-base-mock-upAs the arms dried I looked over to Jay’s workbench to see what he had been doing. Guys, I think that he’s a bit confused. He thought he was building an airplane! The fuselage… the vertical stab… old habits die hard.

wreath-stand-feet-gluedActually, he was looking to see how the legs looked on the base. Here you can see that he is gluing the feet together. The feet are made out of the salvaged oak.

wreath-stand-legs-and-feet-gluedThen the legs were glued onto the feet. Jay and I actually consulted on these feet for quite a while. I really wasn’t happy with how they looked at this stage. Call me silly, but all I could see was an old guy’s skinny chicken leg stuck into an orthopedic shoe. Come on! Tell me that you don’t see it!

wreath-stand-legsWe determined how much to cut off of the bottom to make it a shorter ‘shoe’ and Jay came up with the idea to add the bit of relief to the bottom. I like this. It looks slightly more elegant, if you can call it that. Now instead of an orthopedic shoe we have Snidely Whiplash’s boot!

wreath-stand-base-supports-gluedBefore routing the slats for the other end of the hardware for the arms to slip into, Jay had to glue support blocks to the inside of the base.

Before I left work I received this:

wreath-stand-first-assembly-10-26-16Okay, technically this is the picture that I took when I got home so it’s not the actual picture that I received. But doesn’t that look great?! Don’t worry, Jay promises that when he’s all done the clamps will not be part of the stand.

For comparison’s sake let’s take a look at the original design:

wreath-stand-design-editedIsn’t it amazing how Jay is able to draw something up in the CAD program and bring it to life??

wreath-stand-in-perspective-10-26-16This is going to be amazing once it’s all finished and assembled. After this picture was taken he glued the base pieces together. I should have the arms completely finished by the time that I have to start working on this. We are going to cut the top of the base at an angle so that when you look at it straight-on your eye should be swept up towards the back. One other project that I have to do is make a protective sleeve for the arms to be stored in when not being used. I think it would be easier to keep the whole thing together if they are placed in a sleeve, and the padded sleeve will help to protect them from damage. I plan on using the same material that I’ve been using when I make wing bags.

So, that’s the progress so far. Hopefully the rest of it will go just as smoothly!

Posted in CNC Router, Faith, Wood Work | Tagged , , , | 1 Comment

Insanity, Thy Name is Kerry!

Me and KimberlyWhile talking to somebody at work the other day I realized that Thanksgiving is less than a month away… which means that Advent is only a month away! I know that we’ll have the wreath stand ready by then, but time just seems like it’s zipping by without giving me a chance to pause!

Bob on the BenchThis past Sunday was Confirmation at my church. I knew that Jay wouldn’t want to attend that mass so we went to the earlier one that starts at 8:30 (our usual mass). I was at church from 8 a.m. until 12:45. Then I ran to the grocery store (my least favorite place!) and then headed home. I planned to make meat loaf and cheesy potatoes for dinner. Jay had to go into work Sunday night so I was trying to time everything out in my head. I started to clean up the kitchen while the potatoes were nuking in the microwave. I nuke them to cook them and then let them sit for a few hours to harden a little bit. Then I pour the cheese sauce over them before tossing them into the oven to bake. After the first round of nuking some of the potatoes were done, but others still needed more time. I placed more time on the clock and hit ‘Start’

****Boop**** BLANK…. nothing

THAT is what happened to the microwave! I looked to see if the LED lights were still on as they are plugged into an outlet that shares the same circuit breaker with the microwave. They were still happily glowing purple. Okay…. I went downstairs to see if by chance something was wonky on the breaker panel, but it looked okay to me. Jay was standing at his work bench so I told him, “I think that the microwave just kicked the bucket.” He double checked the breaker panel and then we performed a few more tests on the outlet that the microwave is plugged into, and then plugging the microwave into a different outlet via extension cord. Nope. Still dead. *sigh*

I was told to go ahead and get another one. Where? Our microwave is above our stove and I know that you can’t just be-bop into any store and get one. I hopped onto the computer and did some searching. First off, hardly anybody stocks the stupid things. They have all kinds for sale, but when you hit the button to see only the ones available in the store, most of the inventory goes away. It also doesn’t help when one is boycotting GE stuff since they seem to make most of the appliances out there. No, I will NOT allow anything made by GE or Martha Stewart into my house. To the point where it costs me extra money, as evidenced by my microwave purchase.

new-microwave-10-23-16This is my new microwave. It’s an LG (the same brand as my washer and dryer… and one of my old cell phones). I love the washer and dryer so I’m hoping that the microwave will follow suit. I went with this one because it was in stock. And it had good reviews as compared to the Magic Chef that was also in stock for $100 less. I didn’t want a stainless steel finish, but beggars can’t be choosers. I do love the fact that it has green numbers so that I can more easily see the time from across the room. The old one (and my stove) have blue numbers that I just can’t see with my horrid eyesight.

It took me longer to go pick the stupid thing up from Home Rip-Off than it did for us to install it. Why? Because Jay is blessed with incredible luck (after all… he married me!). Now, if it had been just for me I would have had to tear out the cabinet, rewire the outlet, and possibly re-route the wires just to get the new one to fit. Not Jay. Do you know that this new microwave perfectly fits on the bracket that was already in place for the dead microwave and the holes were all exactly where they needed to be?? It took us longer to measure and double-check the hole spacing than it did to lift it up and get it put into place. It so perfectly fits the spot that it disgusts me. I still roll my eyes and shake my head when I walk by the dumb thing. But that’s how things go for Jay!

Kitchen from LibrarySpeaking of my kitchen, to add more to my pile of insanity, I’m thinking about taking one of the cabinet doors off and stripping the paint to see what the wood looks like underneath. Apparently I’m not busy enough nor do I have enough projects going. The cabinets are made of real wood, not that stupid flakeboard/MDF junk, so I would love to see what they look like underneath the numerous layers of paint. I know that there are numerous layers because a lot of the grooves in the front are almost smooth due to being filled in with paint. I would prefer natural wood cabinets anyway and this would save me a lot of money. Obviously not time… since it will probably take me all winter just to refinish the doors and drawers. Then I’ll have to wait until summer to strip the cabinets themselves with all of the doors and drawers removed. Yikes! What am I thinking about getting myself into!? Every morning I look at them as I’m making coffee and I think about starting on that project. I need to hold myself back until after Christmas. I’m not going to have any time to do it before then!

grace-treen-9-10-16I’ve been stitching like crazy (at least when I have time to stitch like crazy) on the ornaments that I wanted to have done before Christmas. Yeah… I don’t think that’s going to happen! I have Grace and Love stitched, but no beads or finishing done to them yet. I’m almost done with Peace, but that one would have to be finished, too. I am dying to get started on the next Cross that I want to stitch for my wall, the Autumn Cross, but again I have decided to wait until after Christmas to start that. I have enough going that I don’t need to toss that on the pile right now.

wreath-stand-scrapsPlus Jay and I have been trying to figure out what we can make with the scrap wood from the pews that we have left over from the Advent Wreath. We’ll use a good portion of it for little tchotchkes that are handed out to parishioners at the Ash Wednesday mass. These tchotchkes are used as a reminder during Lent for whatever the theme is that we’re supposed to be concentrating on. In previous years we’ve received wooden hearts, pieces of lake glass and little wooden ice cream paddles. Jay and I have offered our suggestions and services for this year, but they don’t have a theme yet. We’ve let the people involved know that we will do this… we just need to know what we are supposed to make. We have a great Small Faith Group that we belong to and they have volunteered to help us when the time comes. I think that we’ll need to make 150-200 pieces of whatever is decided upon. Yeah… that will definitely require a few extra sets of hands!

bob-and-chester-7-24-15Luckily Bob and Chester are resting and relaxing for me. They are taking extra naps to help cope with the insanity. Aren’t they so good to me? Now if I could only get them to fill in for me at work so that I could stay home and get some things done!

Posted in My House | Tagged , , | Leave a comment

Dream – Fabric Shopping In A Flood…

Yes, I was actually sleeping!

Yes, I was actually sleeping!

It’s been a while so I thought that I would share a few of the dreams that I’ve had lately. Please sit back, relax and enjoy the odd trip into my head…

DREAM #1

Little Me

I had a friend who was pregnant and she said that they were having a girl. They went back and forth on names, but finally decided on Lillian Rose. Not bad. Except… the baby ended up being a boy. I’m not sure what they named him!

DREAM #2

Me and Jay

It was summer and I was hanging out with the wrong crowd. I was actually living out CW McCall’s song “Four Wheel Drive” with CW McCall in the back of the jeep singing the song. I wasn’t driving, and I’m not sure who my partner in crime was, but at one point I looked back and we had a HUGE pack of police cars behind us. Their lights were going and they were kicking up all kinds of dust. I laughed and told the driver, “Okay, enough playing in third gear. Let’s lay the hammer down and let ‘er go!” Gears were grinding and then we shot away from that pack like we had finally let the dog off of the chain. We veered into a wooded area where I hopped out of the jeep and waved goodbye as they took off… the music fading away… I turned and found a black Trans Am with the T-top open. I hopped into the back seat and before I knew it we were taking off again. The woman in the passenger seat was being all moody about breaking off her wedding and the driver was just trying to ignore her as he was out-running the cops. It was quite the ride!

Then I believe that Jay and I were celebrating our anniversary so we decided to take a little trip. It was warm weather so we were either in San Diego or down south somewhere. We were staying at a very fancy hotel with a huge marble patio out front. The problem was that the nearby river had flooded so in order to get anywhere you had to walk through 8-12 inches of water! This didn’t deter us because we had brought our boat with us. Yes, apparently we had a boat. It was just a little guy, nothing big, and it was painted in a Miami Dolphins paint scheme. Which is weird because I no longer follow the NFL so I don’t claim the Dolphins as my team anymore. I suppose that if I had to choose one of the two teams that Jay likes I would pick the Packers over the Patriots every single day of the week. But in this dream we went with the Dolphins.

We decided to do some sight-seeing so Jay had the valet go get his car, with the boat hitched on. As it came around the corner Jay was incensed! The boat had a giant scratch down the side of it! The valet had run it into something, but had luckily not done any damage to Jay’s Highlander. Jay read the guy the riot act and the manager promised to pay for repairs. That settled Jay down a little.

As we went driving about I saw a fabric shop on a hill. Apparently I had seen ads for this place and heard reviews about it because I asked Jay if we could please stop. The room that I entered was filled with bolts of organza, satin and silk. There were fancy trimmings hanging here and there with a few models on mannequin torsos. They were so beautiful but I didn’t dare touch any of them! As I walked around I saw all different types of fabrics that I’ve heard about but never seen in person. The bad thing was that everything was  really pricey! As I continued to walk around Jay decided that he was going to go sit in the car. I told him that I wouldn’t be long (HA!).

I walked around the corner into a room with a bunch of knit fabric. Then I found some elastic edging and started checking it out. I thought that perhaps I could use it to redo the straps on my favorite white tank top. Just then the owner of the shop came around and started helping me. She gave me a better trim to use as straps and told me that it was marked down just to get rid of it. Bonus! As I was looking at the jersey knits and wondering if it would be the height of insanity to pay $22/yd for it a Siamese cat came into the room. I bent down to pet her and the lady said that this was her cat who ruled the shop. Except, I noticed that the poor cat had some cuts in her skin and you could see the muscle beneath. It wasn’t bleeding, but it looked painful. The woman said that the cat had pissed off the turtle one too many times and that is what happened. Apparently this wasn’t the first time. I don’t want to see the turtle that can do that! It was at this point that I realized I had spent over an hour in this shop just walking around! I didn’t want to leave Jay out in the car anymore so I broke down and bought a yard of the $22/yd material and the straps that the woman had helped me to find. Then I woke up. Weird!

Posted in Dreams | Tagged , , , | Leave a comment

An Advent Wreath Stand – Part 1

Last month the choir director at church asked me if I thought Jay would be willing to work on a project. When I asked what kind of a project I was told it was a stand for our advent wreath. Up to this point the wreath has been placed high up on the wall and requires a long fire stick to light the candles. It also usually takes two people to light; one to try to hit the wick and the other to give directions on which way to go. Without talking it over with Jay I told Brandon, Mr. Choir Director, that if he could send us pictures of what he was thinking about we might be able to come up with something. This is what he sent:

wreath-stand-original-example-editedIsn’t that gorgeous?? This is a stand from one of Brandon’s friend’s church. A woodworker there made this beautiful piece for them. Brandon wanted this to have a bit of a span, too, so that the wreath can easily be seen from every where in the church. So after a bit of discussion Jay drew up his rendition:

wreath-stand-design-editedThe circle represents the wreath (it’s not actually something that we have to make and attach). If you look at the original wreath stand the arms are curved, but our church has a lot of angles to it so Jay modified that a bit. Then he added more definition to the legs to make it almost look like a tree stump (more input from Brandon). The only thing really left to do is figure out how to blend in the middle of the post. We don’t use the Christ candle (the white one that goes in the center) so the middle kind of needs to blend. We have a little time before we need to worry about that.

Me In My Wedding DressAs you can see from this picture taken on our wedding day the altar and ambo are angular, and even the wall behind the altar is angled. The wreath stand will stand somewhere in the area near the panels hanging down in the back. Also, you will note that the wood is all oak. As Jay and I were discussing the construction of this stand my dad offered up some oak planks that he had salvaged. That helped us for the base, but Jay wanted nice thick arms to hold the wreath and candles.

The church is actually ‘new’ as it was built in 2000 on the site where the ‘old’ church stood. They saved as much of the original materials as they could and a lot of the furniture was made out of the old pews. As we were looking through the storage area of the church we managed to find three pews. They are all that remain from the original church.

wreath-stand-church-pews-2With the help of our dear friends, Dave and Patty, we fetched the pews and put them in the shed.

wreath-stand-church-pewsI borrowed my dad’s planer because I knew that if we didn’t plane the finish off the wood it would take me eight months just to get the old stuff off.

wreath-stand-bottom-of-pewYou can see by the bottom of this pew that there is definitely a color variation in the stain. I was nice and offered Dave $20 to chew some of the gum that we found on the bottom, but he declined.

wreath-stand-pew-in-piecesIt didn’t take long for Jay to get the pews torn apart.

wreath-stand-pew-endsWe had thought about doing something with the pew ends, but after we were looking at them we decided it wouldn’t look right. There is enough material left over, though, that Jay might make a couple of little benches to be raffled off at our summer festival. Maybe.

As we were moving the pew ends around Jay started to curse them because they are so heavy. He stopped in mid-curse, “I can’t call them that! This is blessed wood!” I guess that some of the Catholic schooling paid off!

After the pews were apart Jay cut the wider panels down to more manageable lengths and used his CNC Router to start cutting parts:

wreath-stand-legs-cutAfter they were cut, but still attached to the wood, we put them through the planer. After that the tabs were cut and the pieces were separated.

wreath-stand-arms-ready-to-be-gluedFor the arms and legs he cut out two pieces each so that he can then glue them together. The wreath is going to have a 55″ diameter so the stand needs to be pretty stout.

wreath-stand-arms-glued-and-shapedOnce the glue was dry the arms were run through Jay’s router table to round off the edges. He then used the spindle sander (or the ‘Uppie-Downie Sander’, as I called it) to smooth out the joints and the edges.

wreath-stand-prepping-for-hardwareHere he is working to rout out the ends where the hardware will go to hold the arm onto the base. As we were discussing the project with Dave it was brought up that we should use the same hardware that is used to hold bed frames together. This way they would lock into place and never be seen. It was such a great idea that I ordered up the hardware and it is being fit into place.

Even as I was writing this post Jay came up to show me the arm. After a bit of discussion we might be modifying the design a little more. Luckily we are still able to do that at this stage. In fact, Jay will build a mock stand out of pine to make sure that we are happy with the angle that the wreath will sit at on the stand. I really want to make sure that this is perfect. Which is why I’m stressing about the finishing. That’s my job and I want it to look really good. I want the other woodworkers in church to look at that and say, “My, that is a fine job! I couldn’t have done better!”

wreath-stand-pew-end

Posted in CNC Router, Faith, Wood Work | Tagged , , , | 1 Comment

Dresses for Missions Update – 10-12-16

Now that the weather has cooled a bit and my sewing room isn’t oppressively hot I’ve actually managed to get a few more dresses made.

Dress #33  10-1-16

dress-33-10-1-16This dress has been in my head since I bought the material this spring. All I had to do was just sew it together. Yet, when I actually sat down to work on it I felt no motivation! Typically when I want to make a dress I have a hard time deciding what material to use, then what color trim? After I have those down then I stare at my lace and ribbons for a while trying to come up with a good combination to make it pretty without being too much. This dress was difficult because it just would not come together for me. The fabric was easy, but trimming it was hard! Nothing jumped out. Nothing said, “Pick me! Pick me!” It is the anticipation of trimming out the dress that motivates me to get it done. Not this one. It finally came together, though.

dress-33-hem-detail-10-1-16I think that it was this little pom-pom trim that really messed me up. I didn’t feel like I could use lace or sparkly ribbon on the rest of it with this hanging out there. Don’t get me wrong, it looks adorable! I guess that I’m more of a lace kind of girl.

Which is probably why the next dress was a bit easier to put together.

Dress #34  10-8-16

dress-34-10-8-16I had originally purchased this material to possibly be used as a gift for my sister’s step-daughter. I didn’t end up using it, so it’s been sitting on my fabric shelf for almost a year. I really don’t care for animal prints, but I think that the big roses helped me past the animal-print look that it has going on.

dress-34-hem-detail-10-8-16Plus I had a really long length of this lace with the hearts in it and I just knew it had to go on the ruffle. Plus… a sparkly ribbon. Does it get any better than that?

dress-34-neck-detail-10-8-16Yes, yes it does… More lacey hearts and sparkly ribbon! Because the print was so busy I didn’t really want to distract your eye too much. I felt that the sparkly ribbon would be enough to add some bling without being in-your-face. I then added the lace trim to help tie in the ribbon on the hem. This one actually turned out way cuter than I had expected!

Posted in Charity, Dresses for Missions, Sewing | Tagged , , | 1 Comment

Home Projects – Woodworking

It’s been a while since I’ve updated you on our various home projects that we have constantly in progress. The last time I posted a picture of the shed it looked like this:

Shed - Assembled - 8-21-16Jay kept telling everybody that I always picked the hottest days of the summer to paint the shed. I couldn’t help it! It needed to be done and I only had the weekends to do it. I did one coat of the gray, then I primed and painted the trim. All in told it took me about 18 hours to completely finish it, but I think it was worth it:

shed-finished-10-5-16After we finally received some rain the grass started growing and now it looks like the shed has always been there. Jay was upset that the grass started to grow because he only had to mow the lawn twice the entire summer. It doesn’t take very long to mow our yard, but it’s one chore that Jay really doesn’t like. The week after Jay had his gall bladder removed I mowed the lawn and my sinuses paid for it! I was all stuffed up the next five days!

While Jay was recovering from his surgery he did manage to hang a project that had technically been done for a few months:

spice-rack-10-9-16I had been telling him that I needed to find a way to better organize my spice cupboard. It was a mess! Well, when he was looking through a magazine with storage ideas for small spaces he saw a spice rack and decided to make me one. It works great and now I can find things without knocking bottles over or having to take half of it out so that I can see in the back. It’s amazing how a small thing can make a person happier.

Speaking of small things…

deodorant-holder-2-10-9-16How about that! Now, before you start laughing or wondering what this is all about let me set the scene for you. Whoever invented the stick of deodorant was onto a good idea, but they didn’t think it all the way through. As you use it the container gets top-heavy and is easily knocked over. Now, if you are a clod like me then all you have to do is look at it and the deodorant falls over. It’s one of those first-world problems, I know, but it’s very irritating when you’re reaching for something on the shelf above and just the slight breeze of your hand passing by causes the deodorant to topple. I feel like I’m constantly picking it up, and just as I set it down it topples again… this time taking its buddy with it.

So, like most things, I asked Jay, “Sweetie, would it be possible…” and he makes it happen. Even when I’m not very good at really explaining what it is that I want he still manages to make it happen! It’s a good thing that he knows me so well. I still need to finish the deodorant holder, but I’m so excited to have it ready to install!

So that’s what we’ve been up to, at least some of what we’ve been up to. We are currently working on quite a large project for our church. I will show you pictures of that as we get further along in the process. I’m really nervous about this one because it needs to be perfect and I’m not good at obtaining perfection. So stay tuned for those posts!

Posted in My House, Wood Work | Tagged , , , | Leave a comment

Project Linus Blanket #1

project-linus-blanket-1-9-21-16
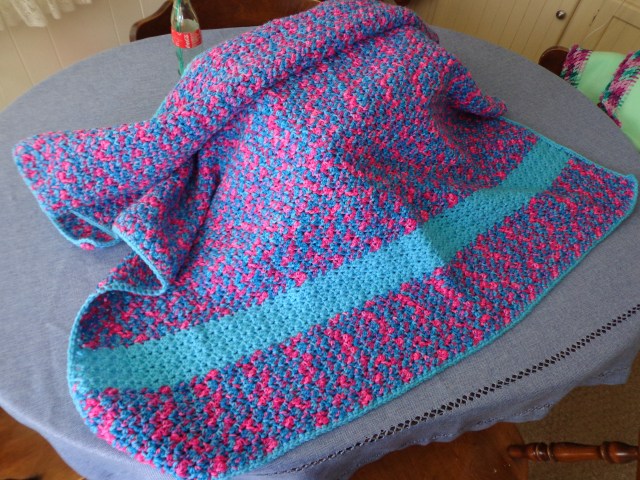
This is the first blanket that I’ve crocheted for Project Linus. This pattern was a simple one that I found as a freebie somewhere on the internet. To be completely honest I can’t even recall what this pattern was called or where I found it. Once I was able to continue to crochet without looking at the pattern I put it in with the dozen other patterns I had printed off. It was easy, but very dense.

I used Red Heart yarn in the color ‘Bon Bon’. It’s a variegated yarn that I thought would make a really pretty blanket. I had managed to crochet the first six inches when I thought, “Man, if I make the ENTIRE blanket this solid color it might drive a person crazy.” I felt that it needed something to break it up a bit so I bought a blue that went really well with it and made stripes on each end. The finished blanket is around 40″ wide by 48″ long, or thereabouts.

fleece-blanket-7-9-21-16I also have another fleece blanket with a crocheted edge to show you. I found the mint green fleece as a remnant at Hobby Lobby. They had a bunch of yarn on clearance so I picked up a few skeins of this pretty pastel-colored yarn for the edge. This blanket will be given to Dresses for Missions. The fleece blankets aren’t as bulky to pack as the ones that are fully crocheted. I don’t like to take up space in a box with one blanket when we could fit three or four dresses in its place.

The next Project Linus blanket that I want to make is a ripple pattern. It will help to increase my crocheting skills by worrying about increases and decreases. The problem was that I didn’t have a whole lot of yarn in my stash yet and so I would have to go out and buy some. That’s when my mom told me to go ‘shopping’ in her stash before doing that. She used to crochet all of the time, but over the last several years she’s been nose-deep in quilting. If she does crochet most of it is baby stuff.

I didn’t touch any of her baby yarn and this is what I brought home:

yarn-haul-from-babes-closetI used two tall kitchen garbage bags to stuff this into so that I could haul it home. I think there are about four afghans-worth of yarn here. The sad thing is that I didn’t even put a dent in my mom’s stash! As you can see I grabbed things with certain color-ways in mind.

I think that I can get two afghans out of this:

yarn-haul-blueBlue is my favorite. As I looked at this I think that most of these is what my mom used to crochet the afghan that she made me:

bob-and-chester-7-24-15As you can see, Chester likes the afghan, too.

My mom must have been given these colors:

yarn-haul-rustI say that because I can’t think of anybody who would have wanted an afghan made with these colors. Project Linus asks that you make blankets using colors that children would like, but I think that you might have a weird kid or two who would actually like an orange afghan. It definitely wouldn’t be me, but there has to be somebody out there who does.

And finally colors for my sister:

yarn-haul-purpleNot all of these purples really go together, but I think that I can use most of it for a couple of afghans. I just need to keep my eyes open for really good yarn sales so that I can supplement and add some more colors that will go with these.

Thankfully yarn squishes so I was able to store all of it into one tote. I am finding that I need to organize my sewing room to accommodate my newest hobby and the accoutrements that go along with it. It would be a big help if I could get rid of the futon that currently sits in the way. I just hate to toss it, though. It’s still in decent shape. Do you know how hard it is to give one away? Oh well. I’ll figure something out.

Posted in Blankets, Charity, Crochet, Project Linus | Tagged , , , | Leave a comment

Corn Hole Bags (and Board!) – NSM

corn-hole-board-sideAs the neighbor kid was helping us with the shed this summer there was talk of playing Corn Hole. If you’re unfamiliar with Corn Hole, it’s a lawn game that’s played using ramps with holes into which you try to toss your corn-filled bag without spilling the beer in your non-throwing hand. Points are awarded based on certain rules, unless you throw those rules out and create your own.


duck-cloth-for-corn-hole-bagsJay decided that he was going to make his own corn hole boards, which meant that I would be making the tossing bags. I had only played corn hole once before so I had no clue where to start. Luckily I found a tutorial that I followed almost to the letter. I bought four different colors of Duck Cloth (this can be found at your local fabric store) in 1/2 yard cuts.


seven-inch-squares-for-corn-hole-bagsOkay, so I actually ended up buying seven or eight different colors. I made a set for the neighbor kid, a set for us, and I have enough left to make a few more sets for whoever wants them.

I cut the duck cloth into 7″ squares as instructed by the tutorial.


sewn-corn-hole-bagsThen I sewed the squares together. This is where I deviated from the tutorial. They have you leave one side completely unsewn so that after you have filled the bags with corn you go back and sew the seam closed with the machine. I didn’t like that look, so being the particular person that I am, I left a smallish opening on one side to turn the bags inside out, fill them, and then I hand-stitched the seam to close it.

*WARNING* If you decide to follow my lead and just leave a little opening on one side be sure to leave the opening big enough to get all of the bag through without too much difficulty. I ended up having to snip some stitches to get the openings a little bigger after I had been too zealous in ensuring that I wouldn’t have too much hand-stitching to do.

corn-hole-boardAs I was turning the bags inside-out I discovered that it helped a little to crunch the squares up a bit so that they weren’t so stiff. I also used a large knitting needle to help push the corners out a bit once the bag is completely turned. Again, I’m a bit picky and I wanted to make my corners as nice as possible. A big thank you goes out to Jay for helping me figure out the quickest and easiest way to get these done. My fingers were tremendously sore after doing the first set by myself!


corn-hole-bags-8-20-16Using Jay’s scale for weighing up glue and epoxy I weighed up the 14.5 oz of corn for each bag. I cut the top off of a pop bottle right above the label so that I could use the bottom for a scoop and the top as a funnel. Remember, I had little tiny openings through which the filling had to take place. I used whole kernel corn to fill them so that they would be as close to authentic corn hole bags as possible.

Oh! Here’s a cute story that you might enjoy…

Cat TalesWhen I ran to the farm supply store to get the corn I also picked up more dry cat food. Bob saw me bring in his bag of food, but he was eating when I put it away in the closet. Then I brought in the 50 pound bag of corn (“How many bags are you making??!!” Jay asked incredulously) and I left it in the dining room. Poor Bob thought that this was his bag of cat food. We have a routine that when I open the new bag of food to pour into their container Bob gets to eat the fresh stuff off of the top until he’s happy. Every time I walked into the dining room Bob would run over and sit by that bag. Finally the day came that I was going to open it. Oh happy day!! Bob was so happy that he did his Happy Kitty dance. I kept telling him that it wasn’t what he thought it was. When I picked him up so that he could look into the bag and sniff it you never saw such a DISGUSTED look in your life! He glared at me accusingly and disappeared after I placed him back on the floor. Poor Bob!

corn-hole-board-sideOnce the bags are filled and sewn shut you are ready to play!

We’ve played with our bags quite a few times and the seams are still holding up nicely. Even if they start to pull apart it won’t take me too long to quickly stitch them up. Plus, I still have 34 pounds of corn on hand if I need to refill them!

Posted in National Sewing Month, Sewing | Tagged , , | 2 Comments

Quilt Show – Part 3 – NSM

quilt-show-quilt-9This will be my last post about the quilt show that my mom and I attended. I apologize if it gets really long.

I have a few more random quilts to show, plus a technique that I find to be really interesting. If I was into quilting it might be the path that I would head down.

Heck, since I’ve talked about it I guess that’s what I’ll start with…


quilt-show-quilt-10I can’t recall what my mom said the name of this technique is, and I’ve searched for it but apparently my random words that I’m punching into Ask Jeeves just isn’t finding the answer for me!

This quilt looks neat, doesn’t it? All of those beautiful patterns and colors go so well together.

There’s a reason why they go so well together…


quilt-show-quilt-10-originalAll of those blocks are made from the exact same fabric.

I know! It blows my mind, too.

If it’s not, it should be called the Kaleidoscope technique because that’s what those squares remind me of when I look at them. How many of you had a kaleidoscope when you were a kid? Such a silly little thing, but it kept you entertained, didn’t it?


quilt-show-quilt-10-squares-1Look at this fabric kaleidoscope…

Just sit and soak it in for a bit…


quilt-show-quilt-10-squares-2So many different, and beautiful, patterns with the same fabric. To be honest, I wouldn’t give that fabric a second glance on the bolt, but in this arrangement… wow!


quilt-show-moon-quiltHere’s another kaleidoscope quilt.

My mom explained how it’s done, but I was only half listening because I was too busy just looking.


quilt-show-moon-quilt-square-3You can kind of see the original fabric around the edge that is used for all of the blocks.

Very old world style.


quilt-show-moon-quilt-square-2I really don’t have much to say about these because I just can’t find the words to describe it. You truly have to just sit and look.


quilt-show-moon-quilt-square-1Very neat.


Babe's Tropical Quilt 2This wasn’t at the quilt show (in fact it’s laid on my mom’s bed for this picture), but this is a quilt that my mom made using the same kaleidoscope technique. So this is what it would look like if you didn’t separate every block with a border.


quilt-show-contemporary-quiltWe walked around looking at more quilts. I was a bit surprised that my mom loved this one. To me it feels very contemporary and not at all the usual traditional style that she likes to make.

She loved the colors, which were more impressive in person. She liked the black and yellow mixed with the soothing tones of gray. She had made a quilt with black and gold, but my friend bought it for her sister who is a HUGE Pittsburgh Steelers fan. That definitely wasn’t the thought my mom had in mind when she made it!


quilt-show-tiny-quiltThere was another type of quilting going on that had my eyes hurting.

See all of those little squares within the blocks? They are pieced squares! With very tiny stitches!


quilt-show-tiny-quiltingHere are my very ugly fingers to give you an idea of how small these blocks are up close. This isn’t the same quilt, but I wanted you to see the size.


quilt-show-small-quilting-hangingThis one might be easier for you to see.

See how small the pinwheels are when I’ve put my big ol’ hand up to it?


quilt-show-small-quilting-hanging-close-upLook at those tiny pieced squares!!

I love to do tiny cross stitching, but I think that this quilting style might cause me to go over the edge of insanity.

No, thank you!

Moving right along…


quilt-show-small-quiltingOh look, now it’s ganging up with its buddies!

It probably has Banty Rooster syndrome…


quilt-show-wooden-ornamentsNot only was there quilts made out of fabric, but one of the vendors actually does wood piecing!

These ornaments are all essentially wood inlays on plywood.

You really had to see these in person to truly appreciate their beauty.


quilt-show-wooden-boxHe even made boxes and other items, including jewelry, using this same design technique.

If I had more patience I might try to convince Jay to help me with this. You can’t cut these little pieces on a table saw, though.


quilt-show-vendorsThere were all kinds of things to look at and buy. We each bought a few things, but not a whole lot. Our main interest seemed to be just looking at the quilts.


quilt-show-mugsThe humorous wares would pop out at us now and again, too.


quilt-show-celestial-quilt-hangingI’m not sure how many pieces in total were at the show, but there were a lot of them.

There was enough variety that it wasn’t like you were seeing the same quilt all of the time.


quilt-show-quilt-2I think that you would be hard-pressed to find anybody who couldn’t pick out at least one piece there that they liked.

There was such a big variety!


quilt-show-quilt-6Whether you like the traditional scrappy look.


quilt-show-swedish-quiltOr you wanted something to remind you of your Swedish heritage.

<I’m not sure if that was the intent behind this quilt, but it screams SWEDISH to me… which I am… >


quilt-show-darth-vaderHopefully you enjoyed these posts. I know that I did.

Now, as one of my favorite quilts at the show would say…

Live Long and May the Force Be With You

🙂


Posted in Blankets, Crafting, National Sewing Month, Quilting, Quilts, Sewing | Tagged , , , , | Leave a comment