Dust Collector Update

Assembled Dust Collector

We are halfway there! Wire has been run over to an outlet box right above the unit, but it still has to be connected to the breaker that we freed up in the box. Except, last week Jay noticed something about the setup that he didn’t like… Can you see what it is?

Dust Collecter Rearranged

The bucket that catches all of the chunks and dust was in the corner, which would be a pain to empty. So he took things apart and rearranged them so that the bucket is now easier to get at. Also, he has managed to run more of the hose to his machines.

Dust Collecting Setup

His miter saw looks so much better without that useless bag hanging off the back of it. And look at what else Jay has done:

More 3D Printed Adapters

He has 3D printed more adapters! This time in a pretty blue.

Modified Table Saw Cart

One of the other tools that needed to be readied for dust collecting was his table saw. He built this cart for it a few years ago so it was easy enough to modify it to accept the dust collecting port and hose.

Table Saw Port

And it doesn’t really take up a whole lot of room on the inside. He still has plenty of storage space. Things are starting to come together!

Posted in 3D Printing, Wood Work, Workshop | Tagged , , | Leave a comment

Project Linus – March 2018

My crochet hook has been busy. I finished my 9th blanket for Project Linus in January:

Project Linus Blanket #9 Jan 2018 - Coffee House

“Coffee Shop”

Why do I call this ‘Coffee Shop’? Well, let’s start at the bottom and work our way up..

You start with a bit of black coffee, followed by an iced mocha (the blue are the ice cubes), then a little more black coffee, then the espresso and a vanilla latte. What is the variegated middle part? Why, those are the coffee grounds all over the counters and floor! Then you work your way backwards again down the menu. It’s making me thirsty!

Project Linus Blanket #9 Detail

Jay was unsure of the blue when I started it, but after I finished the blanket he said that it actually worked pretty well. I think so!

Project Linus Blanket #9

Project Linus Blanket #10:

Project Linus Blanket #10 3-17-18 - Farm Boy

“Farm Boy”

When I picked out the colors for this one I was calling it ‘Painted Desert’ because that’s what the colors reminded me of, but as I crocheted I knew that wasn’t the name. When I got to the burgundy stripe I knew that this was going to be ‘Farm Boy’. You see, the blue and burgundy reminded me of a boy’s jeans and t-shirt. And what do little boys like to do? They get dirty! On a farm there is a LOT of dirt and other stuff to get into, so that’s how the name evolved.

Project Linus Blanket #10 Detail

As I was crocheting the variegated part all I pictured was a little boy jumping in mud puddles and crawling through the dirt. I hope that some little boy likes this blanket, but not enough to get it filthy!

Project Linus Blanket #10

Now onto the next one!


Posted in Blankets, Charity, Crochet, Project Linus | Tagged , , , | Leave a comment

A Dust Collector!

Bob's Tongue

This is Bob. Bob will find the ONE pile of sawdust in Jay’s workshop and walk through it multiple times. Not only did he act as a dust ‘collector’, but also as a dust ‘spreader’. So for Christmas I decided that I would splurge and get Jay a real dust collector.

I did my research because I wanted one that would really work and wouldn’t break after a few uses. As the sole vacuum operator I also wanted one that would keep the majority of the dust under control. Oh, and since the work shop is in the basement I also needed it to be ear-friendly. It costs a pretty penny to meet all of these requirements, but I think that I managed it:

Dust Collector Box

I ordered this a month before Christmas, but it was back ordered until February. Poor Jay had to content himself with drooling over the user’s manual that I had printed off for him. Don’t worry, he didn’t actually read it! I would hate for his Man Card to be erroneously taken. He just looked at the specs so that he could figure out what he would have to do regarding the electrical outlet, etc.

The week it shipped we had gorgeous weather… until the day it was delivered. It poured all day, as you can tell from the picture. There was only one way to get it into the basement: in pieces through the outside entrance. I guess that even then it almost didn’t fit. Jay had to end up taking apart some of the already assembled pieces.

Dust Collector Parts

I have no idea how he managed to get it all downstairs by himself, but this is what I found when I got home from work. Don’t be fooled, those pieces are heavy! At least I was assured that it was heavy duty.

Dust Collector Assembly

The corner was all cleared out and ready for the new occupant. But first it had to be assembled (and parts of it had to be re-assembled!).

Dust Collector Frame

This is Jay’s favorite part. He loves putting things together.

Cyclone Dust Collector

This is a cyclone dust collector, which is a two-stage machine. That means it will be better at getting most of the dust that is being created.

Assembled Dust Collector

It only took Jay a few hours to get it all together. I helped him with parts of it, but then I had to run out to choir practice. Once this part was done he started in on the next phase:

Dust Collector Piping

He is running piping along the wall with gates and ports to each of his machines. He has even done some design work when it comes to the fittings:

3d Printed Elbow

He 3D printed his own elbow connection for the router table…

3D Printed Adaptor

… and the adapter for the pipe that leads to the router table.

This is still in process. I believe he has more adapters and connectors to 3D print, plus he has to rewire the basement to put the dust collector on its own circuit. I’m sure it won’t be long before that is done as he’s very anxious to begin using it.

Posted in 3D Printing, Wood Work, Workshop | Tagged , , | Leave a comment

How To: Easter Wreath

Every time I opened my front door to get the mail I would see the very wilted Christmas wreath hanging on it and think, “I need to do something with that.” Then after shutting the door I would forget about it until the next time I went to get the mail. Usually I don’t keep anything on the front door, but then as I was doing some inspiration research I came across this picture:

Cross on wreath

I really liked this! I felt the cross was a little big, but I loved the contrast of the grapevine wreath against the white flowers, which to me look like crocus.

I decided I was going to make my own wreath using this one as my inspiration.

I needed materials, though, so where did I head? Hobby Lobby, of course! (Have I mentioned that I’ve been going through severe Hobby Lobby withdrawal since July? After switching jobs I no longer work close enough to run there during my lunch break. It’s been a real boost to our checking account, but a severe drain on my mental health.)

Grape Vine Wreaths

I started out with a smaller size grape vine wreath. I bought two of everything so that I could make Karen one for her birthday.

Wreaths - Flowers

Then I divided up the flowers I had purchased. I really wanted calla lilies, but they were very expensive (and I’m kind of cheap). So I bought one bunch of white star-gazer looking lilies and then a vine of purple flowers that I thought would really dress it up.

Now, I admit that I don’t have any kind of style and a lot of the time when I get an idea in my head I just keep throwing things together until it either works or ends up in the trash. I hoped this one wouldn’t end up as another failed project!

Wreaths - Decorating

I played with the arrangement of the flowers until I thought they looked good. I then wire-tied them onto the wreath. It was my original thought that I could use wire so that if I decide to change things out it wouldn’t be too difficult. I ended up having to use hot glue, though, so there went that idea down the drain.

Wreaths - Finished

This was the final result. I used a purple and ivory sheer ribbon to make the bow and then glued it on the bottom. Jay helped me make a couple of hangers for the back, and I added the cross in the middle. It wasn’t my first choice of cross, but there wasn’t a large selection of crosses that really called to me. If I’d had more time I would have just had Jay cut one out with the CNC router, but this was a last minute project.

I guess it looks okay. You can’t really see it from the road, but oh well. It was a nice little experiment. And as a parting thought I’ll leave you with the passage that is on the cross:

Wreaths - Isaiah Cross

Posted in Crafting, Faith, How To | Tagged , , , , | 1 Comment

Spring Cross Update 3-6-18

I promised that I would show you what this cross will look like when I’m done.

Spring Cross

Isn’t it pretty??! No, there aren’t any roses in it, but you have sunny happy flowers! In my eyes they are much better than pumpkins and acorns!

The last time I shared this project with you this is what I had done:

Spring Cross 2-21-18

The daffodil was fully stitched (not back-stitched) and I was working on the purple flowers to the right.

Here is where it stands:

Spring Cross 3-6-18

I have filled in a little green and am working on the purple to the right of the daffodil. I have also moved my fabric on my Qsnap so that I can work more towards the right side of the pattern.

I realized the other day that on this cross I’ve just started working on the right side of the cross without even thinking about it. On the other three crosses I worked towards the left and then went clockwise around them. I start working on the last one and suddenly I’m going backwards!

Either way, it makes me happy to be working with pretty colors again. 🙂

Posted in cross stitch, Faith | Tagged , , , | Leave a comment

Review: Ergonomic Crochet Hooks

Project Linus Blanket #8 Dec 2017 - Autumn in the Pumpkin Patch

If you’ve been following my blog regularly, or you know me in person, you know that I’ve been crocheting blankets for Project Linus. It gives me something to do while watching TV, during long car trips, and even during jury duty.

Growing up my mom always used, and still does, the steel or aluminum crochet hooks.

back-of-tarnished-crochet-hook-11-19-16

I started out using these, but I found that it caused my hand to cramp much easier and I was literally rubbing the color off of the hook.

tarnished-crochet-hook-11-19-16

(I tarnish my cross stitching needles quickly, too)

I wanted to crochet for long periods of time so I started looking at the other options. I didn’t want to use one of the acrylic hooks because I prefer how the yarn glides over the metal post of the hook. I do have a wooden crochet hook (which I love), but that also cramps my hand quicker. I decided to try one of the ergonomic hooks.

Ergonomic Crochet Hook

Now, if you’ve been crocheting for many years using the aluminum hooks the fatness of these ergonomic ones might be too much for you. As a newbie who was looking for comfort, I love them!

Ergonomic Hook Held

My hand doesn’t fatigue as quickly, the grip is cushioned, and I still have a long enough metal neck that the yarn nicely glides over. I have purchased a handful of sizes in this style and they are practically all that I use. In fact, when I was looking for a size 8 steel hook for a future project I instantly looked for one with the ergonomic handle.

I’ve purchased mine at Hobby Lobby (one at a time with the 40% off coupon!), but you can find them at almost any craft store or Amazon. They can be purchased individually or in a full set. To be completely honest I haven’t tried any of the hooks by the other manufacturers as I’ve only purchased the Hobby Lobby brand, but I’m sure that they would be just as comfortable. If you’ve been having problems holding your hook or having your hand cramp up on you then give one of these a try. It just might work!

Posted in Crochet, Reviews | Tagged , | Leave a comment

How To: LED Shop Light

Last year Jay started to convert our lighting in the basement to LED strip lighting.

led-basement-lights

At the time he used the old florescent fixtures and attached the LED strips directly to them. After he ran out of fixtures he started placing them on plywood. This is a simple project that almost anybody can do. Here’s what you need:

1 LED Light Materials

6″ x 48″ piece of OSB

12v 2A wall wart

16′ Daylight White LEDs

Double wire to be used as jumpers

Almost all of the LEDs and wall arts Jay has purchased has been through Amazon.

2 Use Cable Tie

In one end of the OSB drill two holes so that you can anchor the plug end of the LED strip. This is the end that will connect to the wall wart.

5 Tin Solder Pads

Lay out four lines of LEDs. Yes, you can cut them as they are typically on some kind of plastic tape.

3B Plus and Minus

Make sure that when you’re laying out the strips you have all of the ‘+’s and ‘-‘s going the same way. In the example above you can see that on both strips the ‘+’ is on the right and the ‘-‘ is on the left.

Use thin CA to anchor spots that lift.

4 Cut Wire Jumpers

Cut 2 pieces of double wire in 2″ lengths.

Cut one piece of double wire in a 3″ length.

6 Solder Jumpers

Strip and tin the ends of the wires.

Solder the wires to the pads in parallel.

7 Test with Power Supply

Test with a 12v power supply. If the LED’s don’t light up check to make sure you have the wire ends soldered to the correct pads.

8 Install on Ceiling

Install the board using 1 1/4″ deck screws into the floor joists.

9 Plug In and Use

Plug in and enjoy!

Posted in How To, Workshop | Tagged , , | Leave a comment

Review: CAT Air Compressor

In an effort to share what we’ve learned, Jay and I are going to start posting some product reviews on the blog. I’ve asked him to take a look around his workshop and start compiling a list of products that he would like to review. The first one is:

California Air Tools (CAT) Ultra Quiet Air Compressor

CAT Compressor

Model #5510A  1hp 5.5gal compressor

Ultra quiet = 60 decibels!

Go to the California Air Tools website to watch videos and hear just how quiet these air compressors are!

This is a 2 stage air compressor.

It does 0 to 120 PSI in 1 min 53 sec.

It goes from 0 to 80 PSI in 1 min!

CAT Gauges 2

It is all aluminum, which makes it light weight.

When it’s running you barely know that it’s there. You can continue to hold a normal conversation without a problem.

CAT Butt

It also has two handles for easy lifting.

Here is the list of things Jay likes about this air compressor:

Quiet running; No need to stop conversation

Low vibration – set on thick carpet or mat for nearly silent running

Fast fill up and recharge.

Use with nailers, staplers, air ratchet, air brush and paint guns (small).

It has a ball valve drain, not a screw type.

CAT Air Drain

Jay timed it and it can go from 120 PSI to 0 in 20 seconds when you have the drain wide open.

CAT Gauges

There are only two things that Jay would improve about this particular model:

Bigger tank. (He said you can use a stand alone tank if needed)

Manifold with 2 quick disconnects. This only has one, but he plans on adding an adapter so that he can have two air tools hooked to the compressor at once.

CAT Top

Overall, this tank has quickly become one of Jay’s favorite tools. It is well worth the money that you pay, which really is not extravagant. You can find them on Amazon for reasonable prices.

The first time Jay used this I didn’t even realize that he’d been running it. I was in our family room and as I walked through the kitchen I could smell wet paint. He had used the air brush to do some painting and I hadn’t even known! With his other air compressors I can be upstairs in my sewing room and hear them running. Not with this little guy! I give it two thumbs up!!

Posted in Reviews, Workshop | Tagged , , | Leave a comment

Spring Cross Update 2-21-18

As you know, I’ve finished and framed the Autumn Cross:

Autumn Cross Framed 2-3-18

It is now hanging on my wall next to the Summer Cross.

That means I get to start the final cross of the series, the Spring Cross!

Spring Cross Supplies 2-3-18

Look! Very few skeins of orange or yellow!!

I started this on February 3rd. Of course, the flower in the middle of the pattern (where I always start) was a yellow daffodil:

Spring Cross 2-21-18

But look! I get to use other colors, too!! I was so excited as I threaded my needle with the light purple. Finally! Color! I am going to really enjoy this project. When I get a chance I’ll take a picture of the picture on the front of the pattern so you can see what it will look like. It’s going to be gorgeous!

Posted in cross stitch, Faith | Tagged , , | Leave a comment

What’s Jay Up To?

Chausble for Advent

This is the question that I am most asked by people who don’t get to see Jay very often. Or who haven’t seen him in a while. To be honest, there are times that I wonder this myself. What IS Jay doing?? Since Christmas I have been so busy with my own projects and adventures that I haven’t been keeping a close eye on him. He spends almost all of his spare time in the basement. Shall we take a little walk to see what he’s doing? Come with me…

Jay's Laundry

The first stop when we walk down the basement stairs is the washer and dryer area. Well, it seems that he’s been doing laundry…

Cleaned Up Cabinet 2-21-18

He even cleaned off the cabinet by his little workshop door! I haven’t seen that surface in quite a while. So it appears that he’s been doing some cleaning.

Jay's Clean Desk 2-21-18

His desk is clean, too? This might be more serious than I thought! Perhaps I should call the doctor today for an appointment because I think that Jay might be ill.

Wait a minute. There’s something on the 3D printer…

3D Printed Nose Cone

Is it a little dunce cap? An upside-down ice cream cone? A trumpet mute?

3D Printed Nose Cone - Solid

It’s solid. Hmmm… We’ll have to see what else we can find that might give us a clue as to what this object is meant to be.

That’s all I can find in the little workshop. Let’s go back out into the main area of the basement to see what else we can find.

Jay's Workbench

This is Jay’s main work bench. There’s a LOT going on in this one area. Let’s see if we can break it down in pieces.

3D Printed Nose Cone - Orange

Here’s another 3D printed object. It looks similar to the silver one that is still on the printer. I have a feeling we’re going to learn what these are for if we keep looking.

Estes Mercury Redstone

Uh-oh. I know what the 3D printed items are… they are nose cones for rockets! This is not going to be good for anybody who is around the area where Jay intends to set these off. Although, the safest place would probably be at my parents’ house since there’s nothing else around them. Of course, when I was in 6th grade we made rockets in science class and then went to the Lutheran camp on the lake to set them off. A lot of us ended up walking quite far to go fetch our rockets.

Based on the nose cones it appears that there might be at least two more rockets in progress. And they are going to be quite sizable. *shakes head*

Let’s keep looking to see what else we can find.

Spad Artillery

I believe that we’ve found some artillery being prepared for Chad! Do you remember Chad the Spad? Wait, I think I just saw him a minute ago.

There he is!

Spad 2-21-18

He’s been hanging out with Jay at the work bench. I know that I’ve heard Jay talking to somebody down there, but I figured he was talking to himself. Nope. He was carrying on a conversation with Chad.

“So, Chad, do you think these missiles will look good on your wings?”

Dude, they are kind of small. Can’t you make them bigger?

“That’s not realistic! I made them myself, including the 3D printed tips. And you have no idea how difficult it was to get those fins on there perfectly straight.”

But I want to strike terror in the heart of the enemy. To do that you need some nasty big guns. Also, it helps out with the ladies. Come on, man! Do a fellow squid a favor and make them badass!”

Poor Jay. I don’t know how he’s going to win that battle.

Looking closer at Chad, though, I can see that Jay was using his CNC laser cutter to do some vinyl cutting.

Spad Stickers 2-21-18

That’s some pretty nice graphics work! Hopefully Chad was okay with them. Although, he probably wanted Jay to do a little weathering to make him look battle-tested. After all, the ladies really fall for guys with scars.

There’s something else on the bench that has me scratching my head:

Swamp Buggy Prop 2-21-18

Is it a prop tester? If you look a little closer it appears that the prop might rotate. We’ll have to see if we can find any other clues for this one, too.

Turning around I can see that there has been some activity in the other end of the basement.

Basement 2-21-18

Where did the train set go??

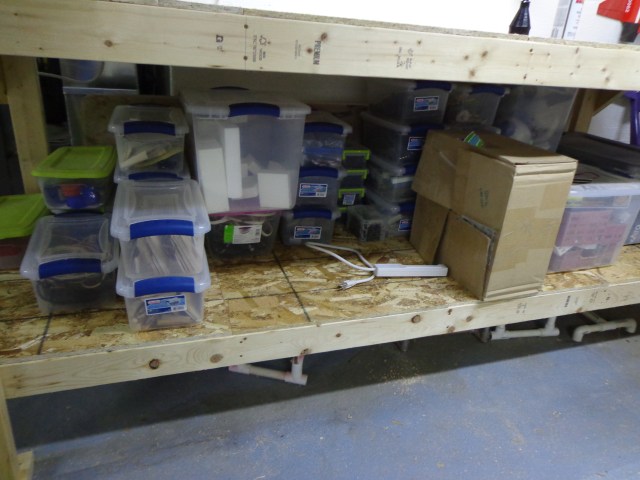
It’s still there, but in pieces. This might be partially my fault. You see, for Christmas I ordered a dust collector for Jay’s workshop. Except, it was apparently a very popular model because even though I ordered it in November it was back ordered until February (I’m still waiting for shipment notification). We don’t have a garage or out-building for Jay to use his wood working equipment and I felt that we should try to get the dust under control. We don’t want to breathe that stuff in all of the time. With that in mind, Jay has been working to organize and set up his workshop with the idea that the dust collector will go in the far corner. Also, this spring we need to get our basement fixed so that we can keep the water from coming in when the snow melts or it rains kind of hard. The train set would have had to move at that point anyway.

Miter Saw Bench 2-21-18

Using some of the material from the train set he made a nice bench for his compound miter saw. To the left you can see his router table, too. The dust collector, from what I’ve been told, will be going into the corner to the left of the router table.

Shop Light 2-21-18

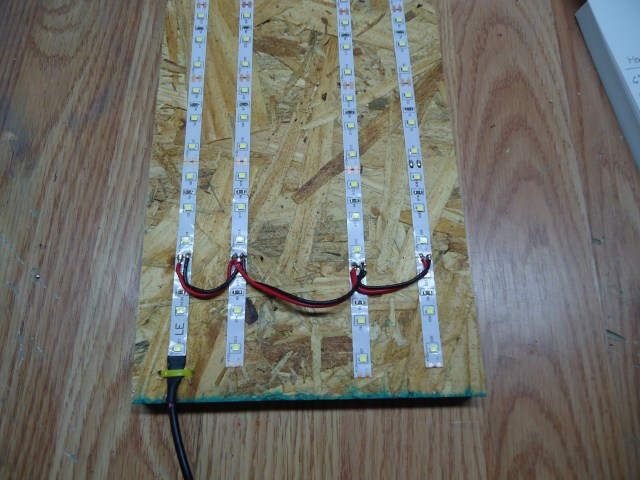
There’s been more lighting added, too. Jay told me that he’d had to order more LEDs because he had used up all that he had stashed.

Partially Built Panther 2-21-18

Remember the Panther? Yep, he’s still waiting to be finished.

Swamp Buggy Bottom 2-21-18

This is the other bench, which is directly across from the compound miter saw. At first I thought that Jay was modeling a Surrey with fringe on top, but that’s not really fringe. It’s more of a veil. This might have something to do with the rotating prop on the work bench. Ah ha! It’s the swamp buggy that Jay keeps yammering on about. When he’s finished it will look similar to a fan boat that you see in the swamps, but this is meant to go sliding across the grass and/or snow.

Wait… what’s that I see in the background?

Rocket Capsule 2-21-18

Do you recognize it? Do you know what it goes to? If you said the Mercury Rocket that we saw on the work bench… you would be correct! I think this is the last of the rocket parts that we’ll see today.

Train Stuff 2-21-18

Look what I found! It’s the train set! This is where it all resides until Jay figures out a place to put it. Right now he’s more into the wood working stuff than the train stuff.

N Scale Buildings 2-21-18

Even the buildings are in a tote. At least they won’t get dusty.

As we leave the basement and digest all that we’ve seen I’ll leave you with one more picture:

MIni Planes Display 2-21-18

The nursery! It’s where all of the baby planes live. Aren’t they cute?! Who’s a good widdle warthog?! Who is? That’s right! You is a good widdle warthog!!

Posted in 3D Printing, A-1 Skyraider, Wood Work, Workshop | Tagged , , , , , | Leave a comment