
(I am writing this on Palm Sunday, but I won’t schedule it for posting until Tuesday. I’m hoping that by the time you read this I am moving things INTO my sewing room!)
When I last showed you my “easy” painting project, this is what the wall looked like:

Thank God for my husband. He came in to see how I was progressing, and after noting the Reverse Spain on the wall, confirmed my fear… what I was actually chunking off was a plaster treatment that had been done on the plaster wall behind it. Our house was built in 1950 so these walls are all original. Back then they didn’t have drywall as we know it. Instead, they had a sort of plaster that was one step ahead of the older lath and horse hair plaster walls (which I’ve seen more than my fair share of in my lifetime!).
Jay asked me what I needed in order to help me with this project. Was there a special tool or device that would make it easier. I admitted that his help is really what I needed. You see, almost all of these projects I do myself. Jay will come in and help as needed (construction, destruction, electrical, etc), but for the most part I am the only one working on these projects.
When I got home from work the next day Jay was already in there chunking away at the wall and making all kinds of progress. Reverse Spain was turned into Greenland and there were other little spots of plaster still left on the wall. If it was stuck solidly on there we didn’t want to disturb it. I went and bought a bucket of drywall mud because we thought we might have to do a skim coat across this entire wall. Jay scored the corners so that the plaster topping couldn’t pull off of the other walls. It was decided that we definitely didn’t want to do this to the other three walls. We started by feathering the edges of the old plaster with the tinted plaster.
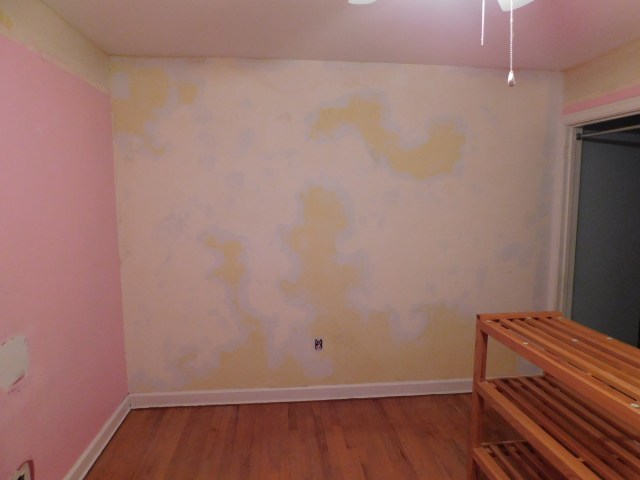
The yellow is the tinted top layer of plaster, the white is the original plaster wall. This wall was not pretty. There are all kinds of gouges and dimples in it. We tried to smooth them out the best that we could. Once this was dry we sanded it smooth and decided we wouldn’t skim coat the entire wall after all (so if anybody needs some drywall mud, let me know).
Jay also fixed that horrible patch above the heat register.

Just so you know, he fixed it the correct way with a hunk of drywall and secured it in the spot. Then we used the mud to smooth it out and keep it in place. The other patch had been a mess of tape and mud. If anybody had knocked into it the patch would have collapsed. Also, I removed the heat register and bought a new white one.
As for the rest of the walls it was decided that I would do my best to remove the rest of the border, then we would take the palm sander and smooth down the edge where it met the paint.

At this point I just wanted to get the room done.
We painted the ceiling and put a coat of primer on the walls.

That plaster really soaked up the paint. Which I completely expected, but I ended up running out and buying another gallon of primer.

Especially since that first coat didn’t cover the pink really well. If I was going to paint a darker color over it I would have just left it. However, knowing that I was going to put a white top coat made me decide to put a second coat of primer on for good measure.

You could still kind of see it, but not nearly like before.

I wanted to make sure the plaster was done soaking up paint before I used my paint. After all, I only had one gallon of this paint to use. Remember, I bought it for the bathroom closet, but had it tinted to a color that I was going to use for this room.
Now, because the walls are going to be white I wanted to add a little bit of sparkle (literally) to the wall. Originally I was going to paint it with the latex paint and then buy a Rustoleum product that was like a top coat with silver glitter in it. I had seen it at my local Wal-Mart, but of course when I went to buy it they had removed it from their planogram for that shelving. There was no way I was going to pay $26 for one quart and not have it be enough. Well, when you look it up on Amazon you also see this stuff called Hemway Glitter Paint Additive.
You add it to your paint and then it’s an all-in-one-step kind of deal. That sounded way better to me, so I ordered two bags of the Mother of Pearl color. I decided that an iridescent sparkle was my cup of tea.
The day came and I added both bags to my paint.

This picture is a bit dark, but you can tell that my walls are just a few shades darker than the bright white ceiling.

After doing one coat of paint I realized that I had missed some spots. To be fair, it’s hard to see where you’ve painted when you’re painting with white paint on top of white primer. I went back and did a second coat on this wall and touched up spots on the other walls.

The color doesn’t bother me because it’s not a sterile white. I was, however, disappointed in the sparkle. Now, I didn’t want an IN-YOUR-FACE kind of glitter, but I wanted it to be visible when the light hit it. When I was growing up my parents had sprayed our living room ceiling with a thinned-out drywall mud and tiny pieces of glass so when the lights were on you saw the sparkle. It was really pretty at Christmas.
Anyway, this was all the sparkle I could really see (and get a picture of):

Can’t really see it, can you? In person if you moved just right you would catch a sparkle here and there. I thought about it and decided that I could be happy with it as is. Or so I thought. Then I remembered reading in the reviews that when you buff it the sparkle comes out even more. So I grabbed a sponge that had the scrubbie stuff on one side.. and proceeded to rub a blue hue onto my white wall. After using a Mr. Clean Magic Eraser (which I LOVE), I decided to order the buffing pads that the glitter company sells. They arrived in the mail yesterday so I tried them out.

It was like magic!! And it makes sense. You dump this glitter in the paint and somehow you expect that it’s going to land on the top side of the wall clean enough to pick up and reflect light? That’s not how it works. You have to clean the paint off of the glitter.

Those stupid little buffing pads completely made this entire sewing room. Walking into the room with the light glinting off the walls makes me smile so much.
With the walls done I needed to turn to the trim. I had decided I was going to paint it in place because I didn’t want to pull it off the walls to refinish. Then I started cleaning it up by removing the old paint drips and sanding it down.

I started with that base board. It peeled so nicely. Then I moved to the window.
I didn’t show you this, but the previous people hadn’t even removed the blinds when they painted the window casing. They just had them pulled all the way up!

Why would you do that?? Needless to say, they will come down before I start to paint this window. And um… I made a mess.

This was the best picture I could get of it. The other side looks about the same. The paint peeled right off of the varnish below it. You could see that they hadn’t even sanded the window frame before painting it. How it didn’t chip before now, I have no idea.
So then I had a quandry… Seeing the beautiful wood made me REALLY not want to paint it. Yet, I feared what would happen if Jay started to pull the trim off considering the walls are already painted and I only have an inch of the paint left in the can. Not to mention that this trim is original to the house, so it’s old varnish, which means it’s going to be extra-stubborn to remove. That was actually the clincher for me right there. Knowing that I would spend at least a week trying to clean the paint and old varnish off of this trim, then spend another week putting coats of finish on it… No.. I can’t do that right now. So it’s going to be painted. End of story.
In the meantime, I’ve had help on this leg of the project. When I’m not running anything noisy Bob has been perched on his cushioned tote to supervise.

And of course, Mama indulges him by moving the tote around to keep it in the patch of sun as it moves across the floor.

Pingback: N Scale Layout- Giving it Hill(s) | Kerry'd Away