
It all started with a picture similar to this:
Brandon, our choir director and church environment extraordinaire, decided that he wanted to do something similar for Easter. Could we (meaning me) do it? It didn’t look too hard so I said yes. I figured the hardest part would be finding enough ribbon as he wanted these to be tall banner-like hangings. He gave me the colors that he wanted and then turned me loose. After I had ordered what I thought would be the right colors, I had to ask Jay to make the pieces from which the banners would hang.

These are what they looked like after I did all of the sanding on them. Jay thought I should use the electric sander, but I hate the marks it leaves behind. Instead I started with 60 grit sandpaper and worked my way down. Because these had been 2×4’s there were quite a few rough cuts that had been made and blade marks that had been left behind. Using my trusty elbow grease I managed to smooth them out.

I then did a light stain and two layers of matte polyurethane. I didn’t want them to be super shiny. I also wanted them to be able to go with almost anything that would be hung on them. After all, these can be used year round if needed.

Here they are sitting on top of the poles.
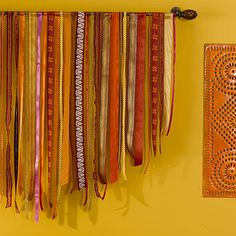
The next step was to figure out how long we wanted the banners, and then arrange the ribbons in a pleasing fashion. This was definitely NOT my area of expertise. I love symmetrical things so abstract art is not my style. I took the ribbons to church so that Brandon and I could arrange them together.

We laid out masking tape at the various lengths that we needed, and then we started unspooling and cutting the ribbons. There was a LOT of ribbon.

We started out a little on the skimpy side as we weren’t really sure where we were going with this project.

By the end we were tired so we just threw ribbons at these hoping they would look okay. I told Brandon that I would take them home and determine if they needed additional ribbon.
This next step was actually the most difficult out of the entire process…

… listening to the cats whine since I had placed the ribbons safely behind the closed door of my sewing room. Then listening to Bob sit outside the door crying as I worked on the banners. Can you imagine if I had allowed them in the room while I was messing with the ribbons??!

I actually put two hooks on the other door in the sewing room so that I could hang these and figure out if there was anything missing. I think the hooks will come in handy when I need to hang up various projects that I’m sewing. So I left them on the door after the banners were finished.

Once I had finished determining placement I then sewed the ribbons onto a piece of light pink bias binding. Then I took a strip of tulle, sewed the strip of ribbons to it and made a rod pocket for them. I also had to cut long lengths of shiny tulle and sew a rod pocket at the tops to be used as backdrops to the ribbon banners. I felt that they would need the little bit of solid behind them.
They actually turned out better than I expected (despite some nay-saying that was going on when they were being placed in the church). What do you think?


I thought that they really tied our gathering space in together with the sanctuary. Brandon used a lot of white and pink flowers.


As the flowers die we can re-position the ribbons to keep the colors in the sanctuary. Now that we know what we’re doing we can use the idea for other parts of the year.
